Using the local Data Preparation Tool

The Data Preparation Tool (DPT) is meant to help you prepare your data locally, off-line, to be compliant with the minimum requirements needed to publish data in Archives Portal Europe: one EAG file describing your institution, and apeEAD files describing your archives. You can also use it to create holdings or source guides in apeEAD format as well as descriptions of records creators in apeEAC-CPF, and you can convert apeEAD files into EDM for data sharing with Europeana.

That means, the DPT offers the same range of functionalities as the dashboard, with a few additions. This tool is a validation tool, a conversion tool, an edition and a creation tool all-in-one. These actions can be used separately, combined, processed in batch etc. and there are various options to check one’s data at different stages during the processing, before or after conversion. You can also use the DPT with your own standards, schemas, and transformation stylesheets if wanted.

Validation tool

Against existing schemas: this allows you to check whether your data are compliant to the EAD schema for instance. After a conversion: this is a mandatory step to obtain correct apeEAD, EAG2012 or apeEAC-CPF files that can afterwards be uploaded and published in the portal.

It is also possible to use the tool with your own local schemas to validate XML files.

Conversion tool

You can convert from a lot of different formats to a lot of others. You can even import your own stylesheet to convert your data: from EAD 2002 to apeEAD, from apeEAD to EDM etc. You can also create your own date conversion table to get normalised dates (for instance from: "20th century" to: "1901/2000").

Edition tool

Once the conversion is done, you can edit your file and check that everything went smoothly; on top of that, the tool provides you a report on the points that could be improved (data quality check), e.g. by normalising the dates, adding titles and including the type of digital objects.

Creation tool

The tool offers you the possibility to create different types of files from scratch: holdings guides based on your finding aids, EAG2012 files, EAC-CPF files and EDM files from your apeEAD files. Please note that the tool is able to work with XML only. Other data cannot be processed by the tool and have to undergo additional actions before being ready to be used in the DPT.

Installation and launch

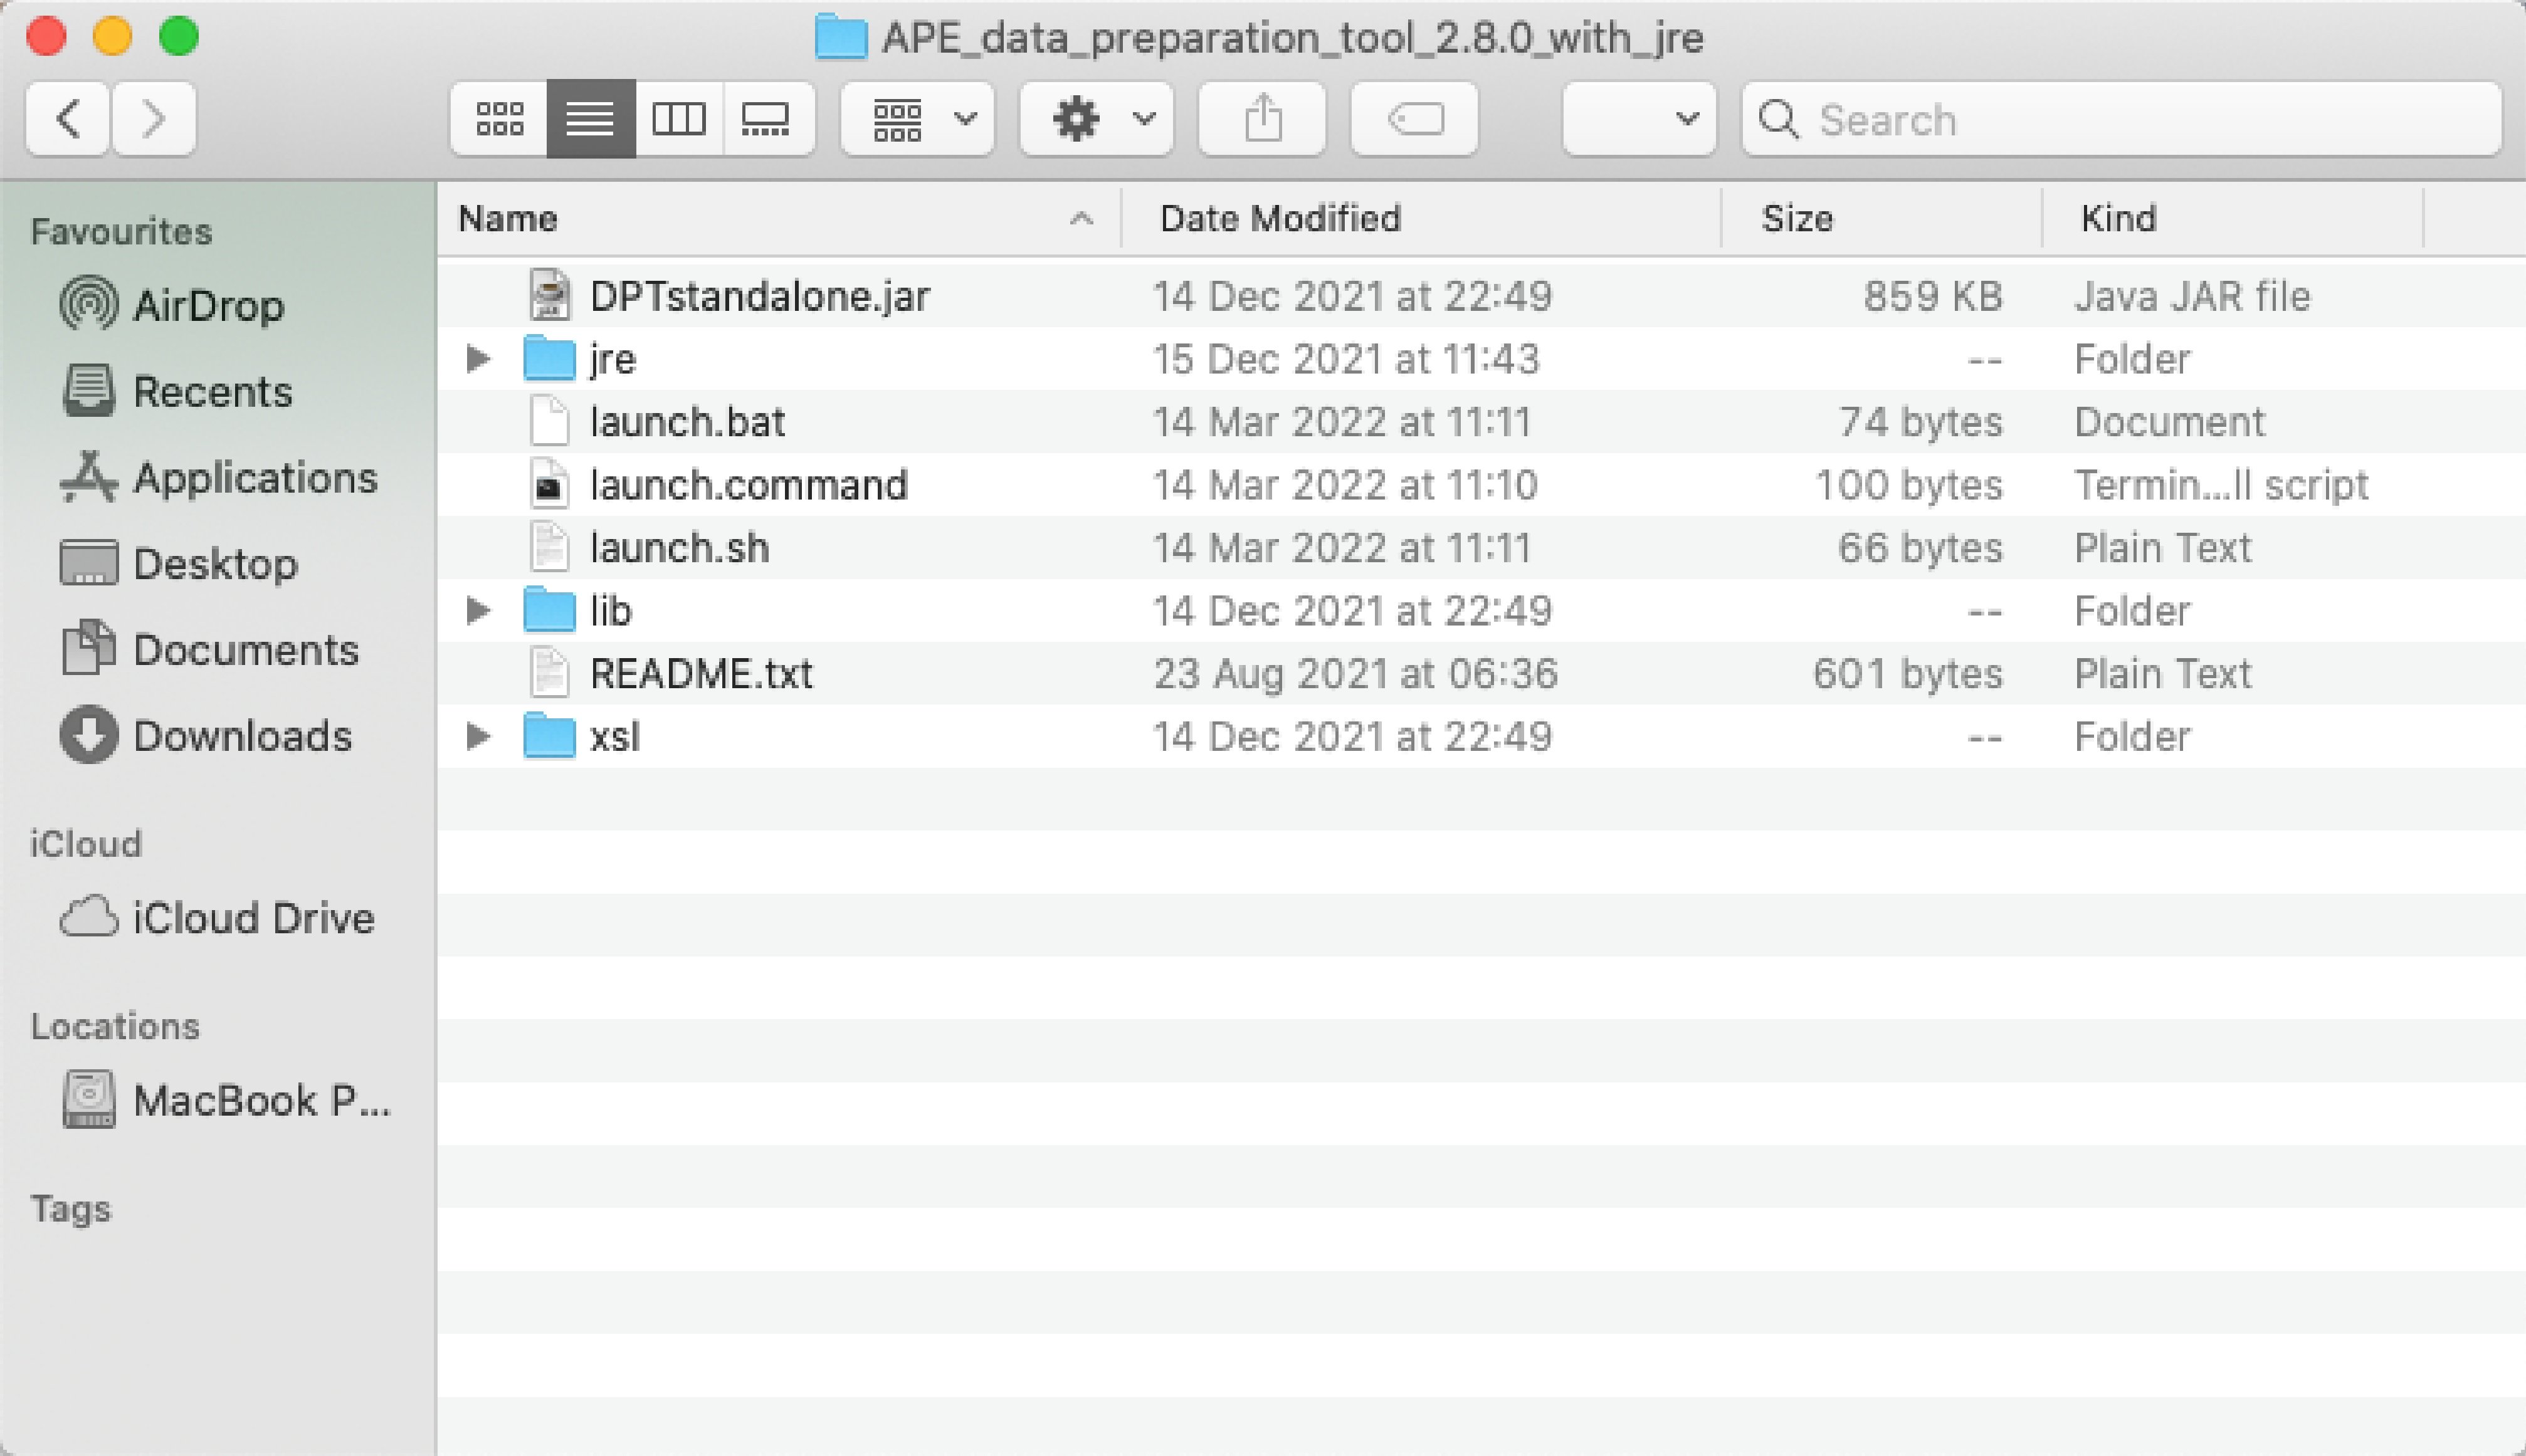
You will find the latest version of the DPT on our GitHub page for download. It is distributed as a ZIP file named e.g. APE_data_preparation_tool_1.1.1.zip, where the number indicates the version of the tool.

You will need Java JDK 6 (1.6) or later to run the tool. This needs to be installed in your device already, when downloading the default version of the tool. You can verify whether Java is installed on your computer, and which version, by launching the command prompt (Windows) or terminal (Linux) and typing: java -version. On a MacIntosh computer you can go to 'system preferences' and see if there is a Java icon there, if so, Java is installed and you can click on the icon to check the version. Alternatively, you can download the version with JRE, which will come with Java included in the bundle.

To install the tool, simply download the ZIP archive of the newest release in the version best suitable for you and uncompress it locally on your own device with winzip, 7-zip, unzip or a similar tool. You will find two respectively three folders (lib and xsl, plus jre if you have downloaded the extended version) and five files, a README text file and the following four files, one of which you will need to launch the tool depending on your operating system:

  • double-click on the launch.bat file when using Windows.
  • double-click on the DPTstandalone.jar file when using MAC (or on the launch.command file if you have downloaded the version with JRE included)
  • launch the launch.sh file using your terminal when using UNIX (i.e. type "sh launch.sh" – make sure that the file has at least the execution rights, "chmod +x launch.sh").

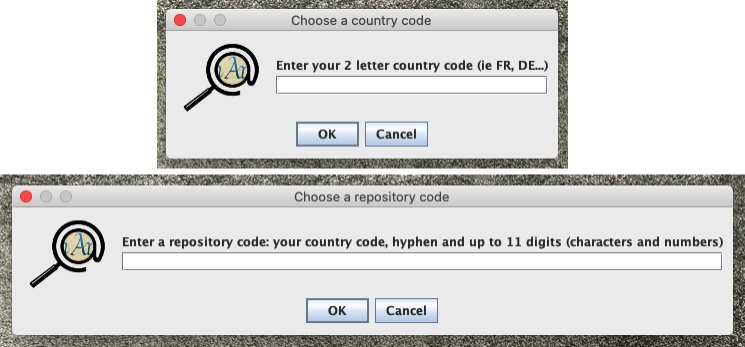
At the first launch of the tool, a dialogue box will appear, asking first for your country code (2-letter country code, in capital characters, compliant to the standard ISO 3166-1), then for an identifier for your archival institution: please enter your registered ISIL code if you have one; otherwise, please enter an identifier that conforms the structure defined by the standard ISO 15511, i.e. in most cases starting with the two-letter country code, followed by a hyphen, followed by up to 13 alphanumeric characters.

You will only be asked about these identifiers once when launching the tool, but you will have the option to change either of them via the preferences later on if necessary.

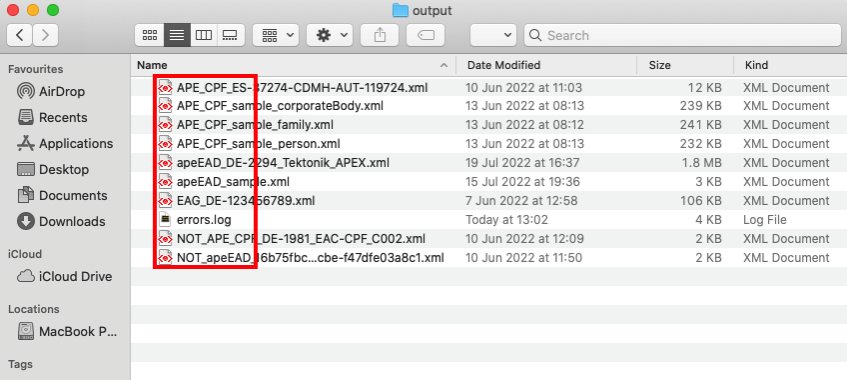
You will find that with the first launch, a new file (derby.log) and three new folders (apeoptions, output, and temp) have been added for the DPT. Especially the output folder will be of importance once you start working with your data as this is where you will find your converted, validated, and/or edited files - as long as you do not specify another folder in your file system for this.

Furthermore, the program should now be running and you will see the general user interface (GUI) with its default settings. If this is not the case, please go to the output folder of the tool and retrieve the file named errors.log, then send us an email with the subject "Technical issues" and either copy/paste the content of the errors.log into the email or add the file as an attachment. If you can, please include some explanations of what you tried to do when the error occurred and let us know which operating system you use. The same applies to any other situation when you might get any unexpected - or no - reaction from the tool.

Overview of the main page and its sections

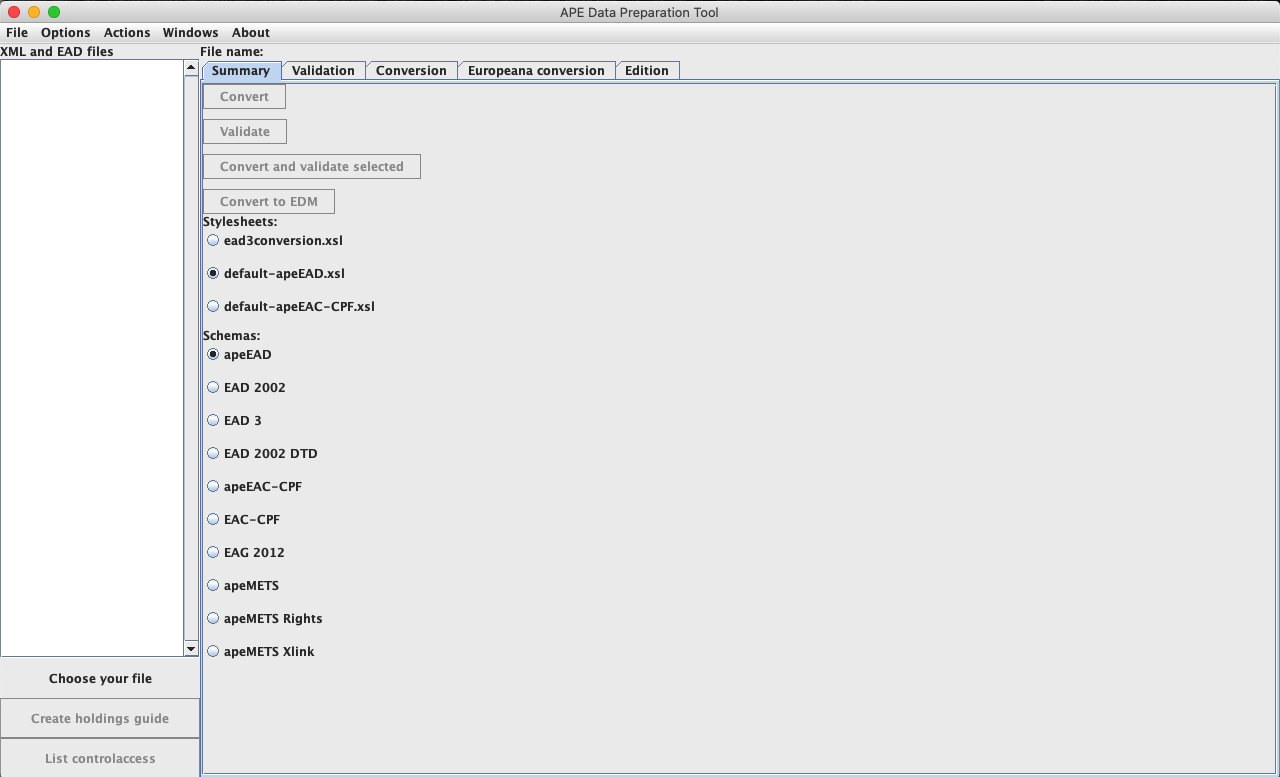
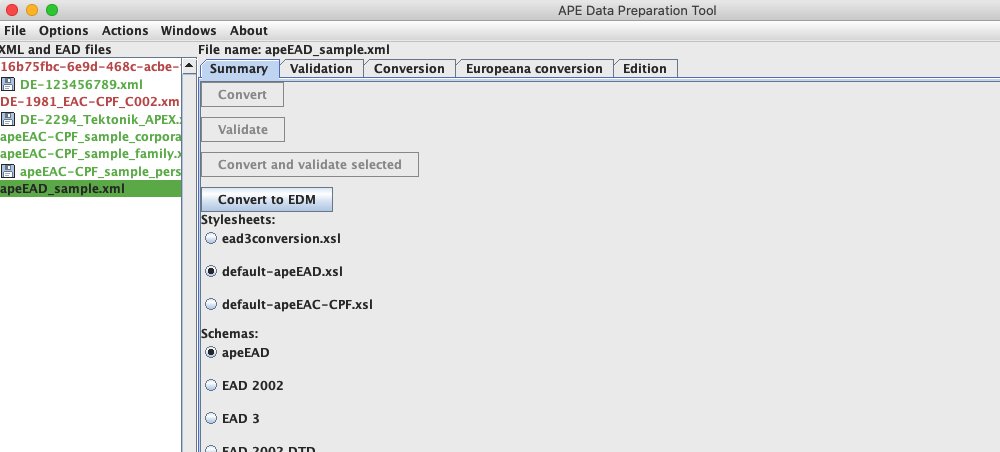
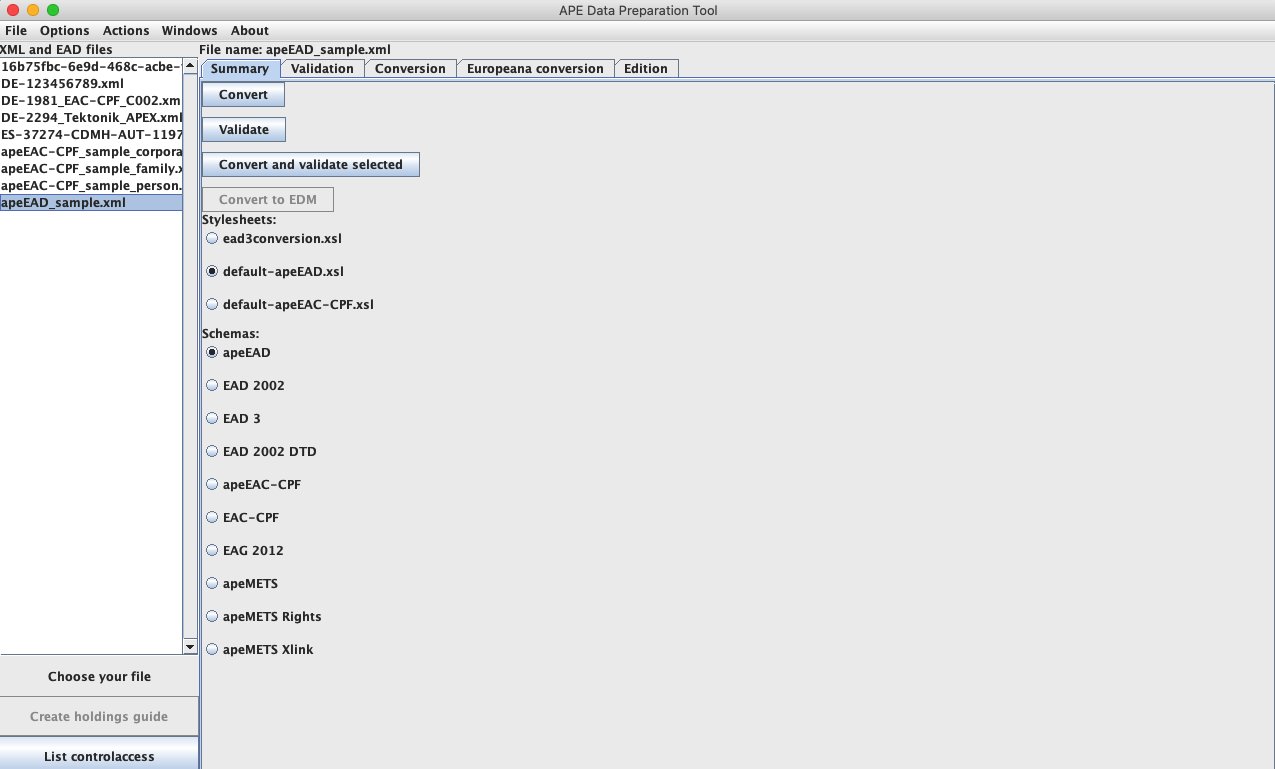
The DPT has five main menu points, which you can access at the top of the GUI: File, Options, Actions, Windows and About. Below you will see the screen divided in two parts:

  • the left side shows an empty list named: XML and EAD files with three action buttons at the bottom, one of which is active by default: Choose your file; the other two are named: Create holdings guide and List controlaccess,
  • the right side contains five tabs at the top named: Summary, Validation, Conversion, Europeana conversion and Edition.

Just above these five tabs, you can see the label File name: . It is meant to display the name of the file that is selected while working with the tool (only if just one file is selected, not when you are working in batch with several files).

The Summary tab has:

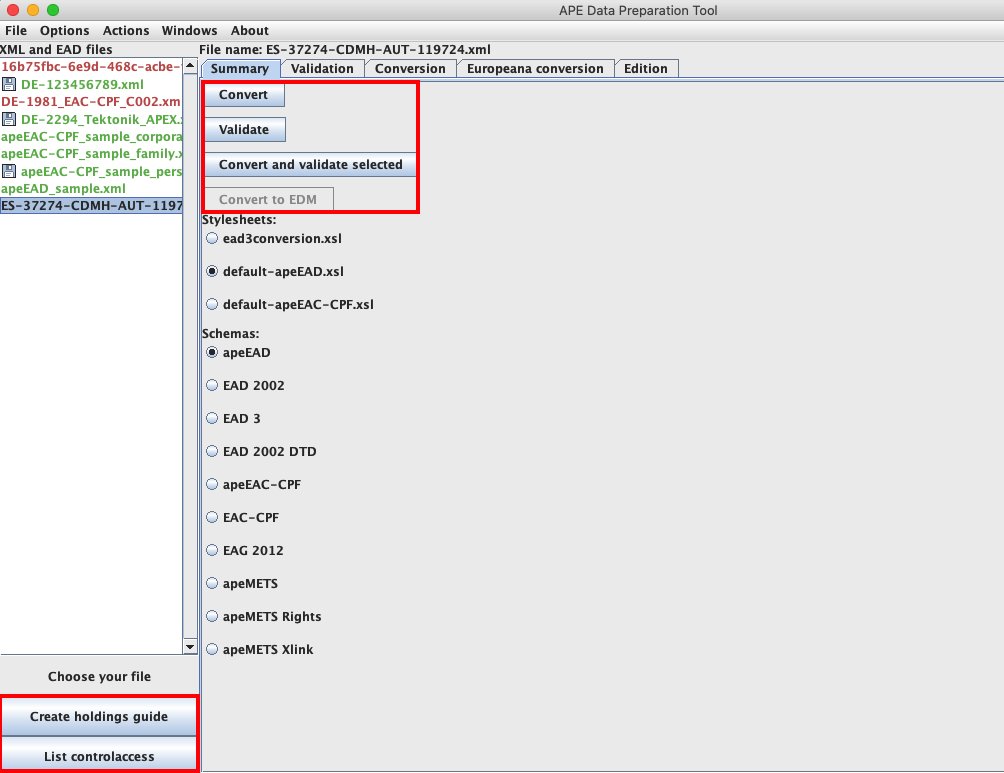
  • four action buttons named: Convert, Validate, Convert and validate selected and Convert to EDM, which will remain inactive until you start working with files in the tool;
  • two radio button lists:
    • one named: Stylesheets for choosing the stylesheet needed: ead3conversion.xsl, default-apeEAD.xsl or default-apeEAC-CPF.xsl,
    • one named: Schemas for choosing the schema to be used: apeEAD, EAD 2002, EAD3, EAD 2002 DTD, apeEAC-CPF, EAC-CPF, EAG 2012, apeMETS, apeMETS Rights or apeMETS Xlink.
    • When first launching the tool, the options default-apeEAD.xsl and apeEAD will be selected by default.

The other tabs stay empty until a file is processed. Once a file has been processed, they will display the according information.

The menu options

The "File" menu

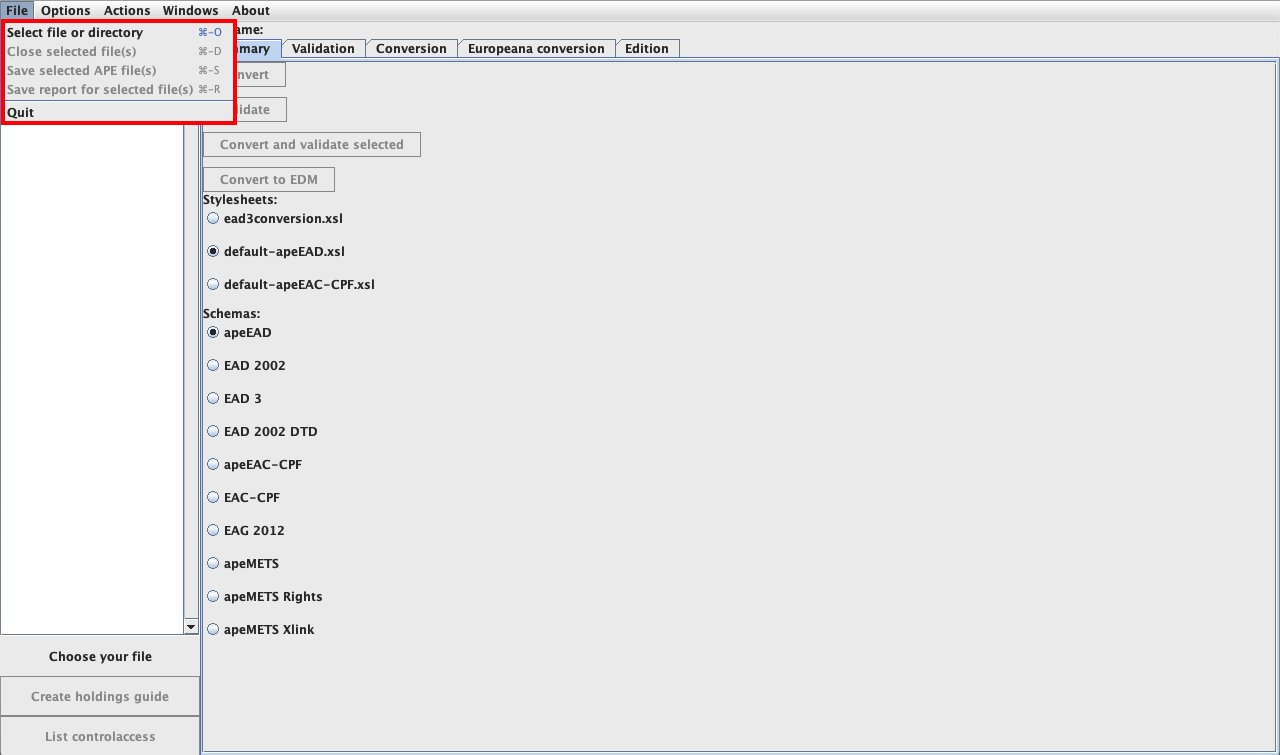
There are five sub-items in the "File" menu:

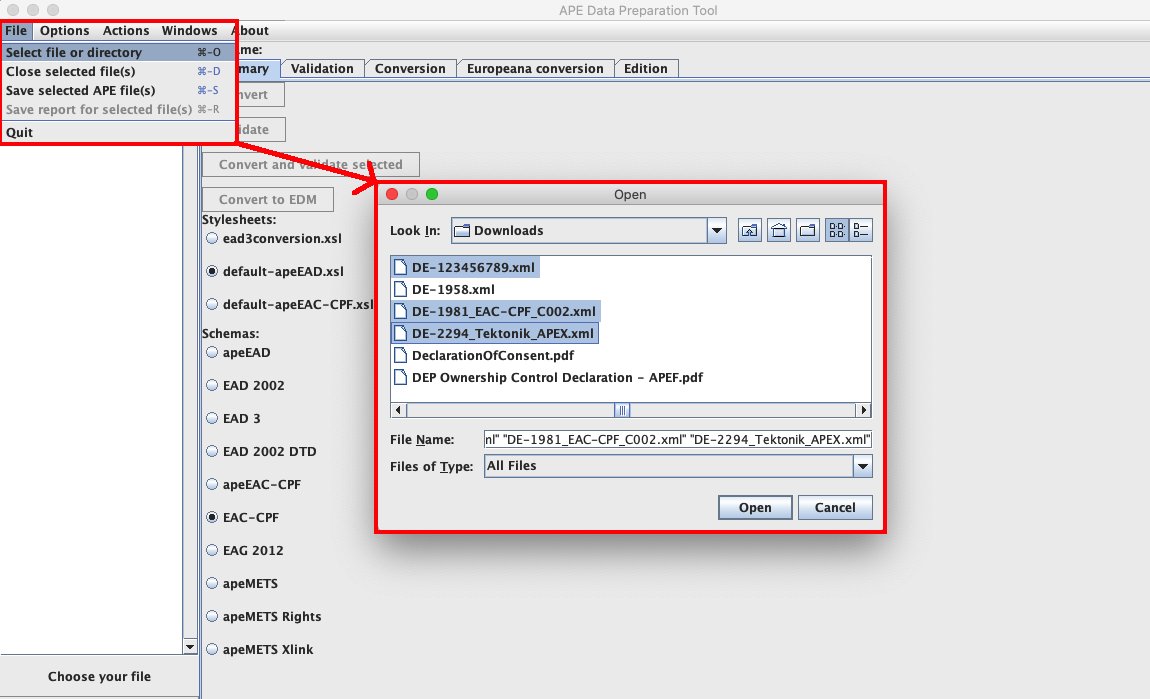
  • Select file or directory (shortcut: Ctrl+O or Cmd+O)
    This is where you can open your files or directory (folder) to select either one or several files, or one directory, for processing in the tool. If you select a directory, the tool will import all the files located in this directory, however, subdirectories will not be included.
    Once you have chosen the files you'd like to work with in the tool, they will appear in the "XML and EAD" part on the left side of the screen and are ready to be processed.You can process hundreds or even thousands of files in batch. Selecting one or more files from the list will activate the buttons in the right part of the screen and the one named "List controlaccess" at the bottom of the screen.
  • Close selected file(s) (shortcut: Ctrl+D or Cmd+D)
    Using this option with one or more files selected in the left part of the screen, makes those files disappear from the list. So this is in fact an 'unselect' option.
  • Save selected APE file(s) (shortcut: Ctrl+S or Cmd+S)
    Once one or more file have been converted and/or validated using the buttons in the right part of the screen, they have to be saved to your hard drive and you can do that using this option. The newly created files will be saved in the directory named output by default, but the Options menu allows you to change that to another location.
    The names of the files will change when they are saved. If the file has been converted and validated, it is saved with the prefix apeEAD_, i.e. the name of the file in the output folder will be apeEAD_{original_name}.xml. If it is only converted, but not validated yet, the prefix will be NOT_apeEAD_, i.e. the name of the file in the output directory will be: NOT_apeEAD_{original_name}.xml. Of course, this does not affect your original files, nor will a NOT_apeEAD_ file be overwritten by an apeEAD_ file in case you perform the conversion and validation steps as two separate actions.
  • Save report for selected file(s) (shortcut: Ctrl+R or Cmd+R)
    Use this option in case you want to have a report on the actions you have performed in the tool.All reports on the files processed in the tool (and selected in the list), even if the files did not pass the validation or conversion steps, are saved in one file, which is by default saved in the output directory of the tool and named: report.txt.
  • Quit
    Use this option in case you want to close the tool and its interface.

The "Options" menu

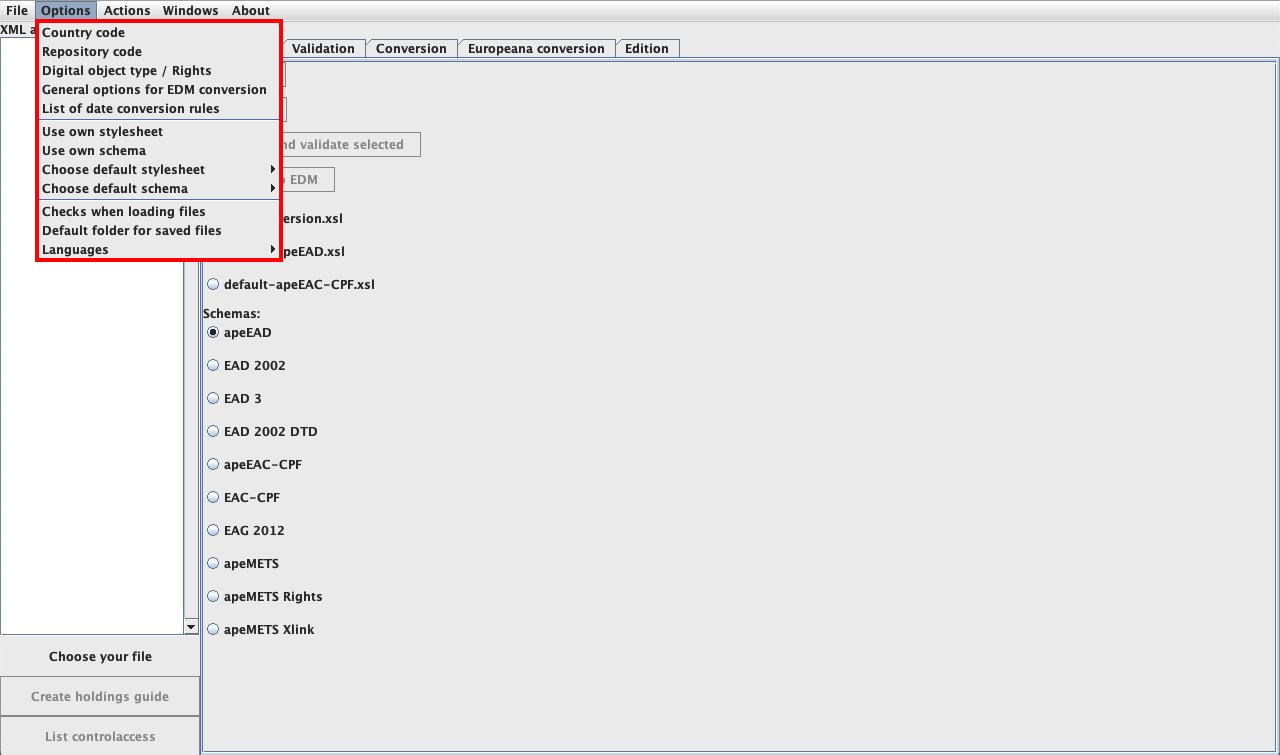
There are twelve sub-items in the "Options" menu. They are meant to set up and maintain your own parameters in the tool, allowing you to apply specific rules when processing of your files:

  • Country code
    Here you can change the 2-letter country code, the one you had to enter at the first launch of the tool. Clicking this menu item will open the same pop-up again.
  • Repository code
    Here you can change the identifier for your institution, the one you had to enter at the first launch of the tool. This is useful when you manage more than one institution. Clicking this menu item will open the same pop-up again.
  • Digital object type / Rights
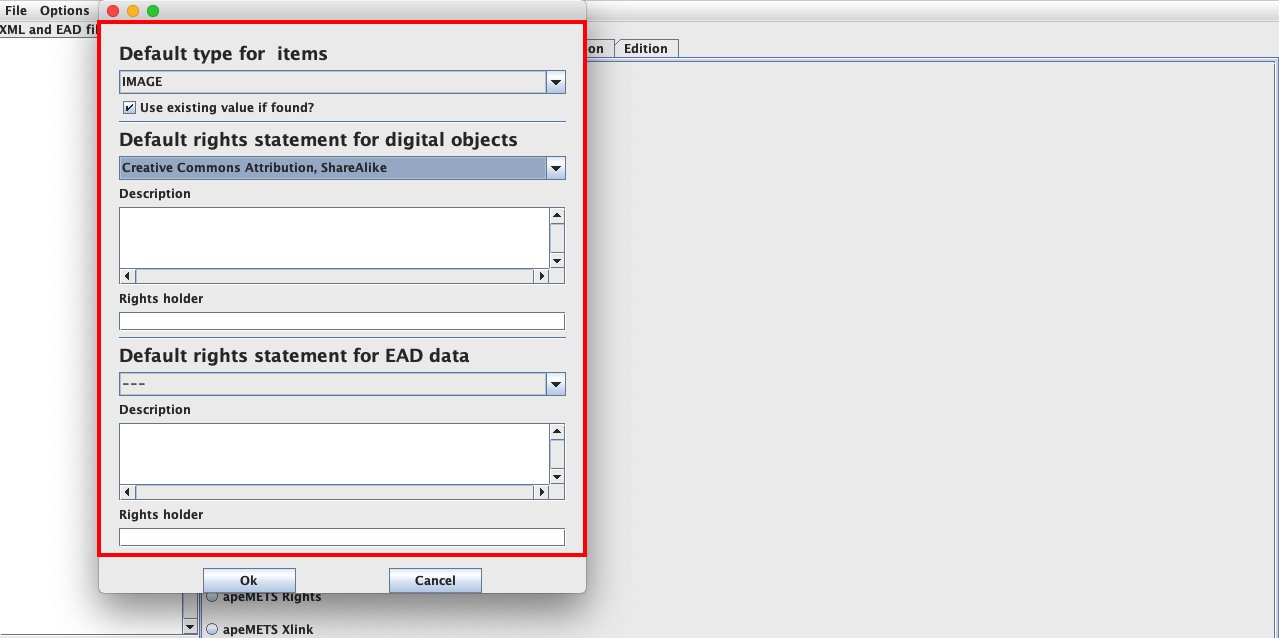
    This option allows you to add specific information on the type of the digital objects that your data might link to (if applicable) and on the rights for using and re-using the digital objects as well as the metadata themselves. The latter is mandatory when sharing your data in Archives Portal Europe or in Europeana (which requires metadata to be under a CC0 licence); for digital objects, licensing information also is required for Europeana and strongly recommended for the Archives Portal Europe. Please be aware of the fact that the choices you make here will be applied to all files you process in the tool, until you change them (see the overview of available licences and rights statements in Archives Portal Europe for more information).

The digital object type indicates whether the digitised archives are Text, Image, Sound, Video or 3D. If you don't use this option, the default value will be Unspecified. This option is used within the Archives Portal Europe for refining the search results. The values chosen are saved in your apeEAD XML files when you convert them. The chosen digital object type will then be available inside your apeEAD XML file within each <dao/> element as value for the attribute @xlink:role. In case, your local data already contains this information, you can indicate that this information has to be kept and is not to be overruled.
Note: Converting the file and then choosing a type will NOT change the type inside the newly created file. A new conversion is needed.

For the rights information, you can select from six Creative Commons licences, the CC0 Public Domain Dedication, or the Public Domain Mark as well as from six selected rights statements from rightsstatements.org. Furthermore, you can add a description and the name of the rights holder(s).

  • General options for EDM conversion
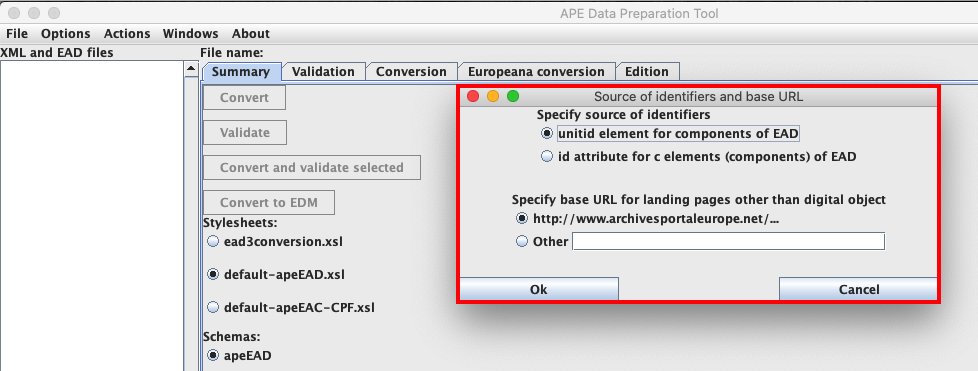
    Using this option you can fine-tune some parameters for the apeEAD to EDM conversion and set them as default for any conversion to EDM that you might conduct later on with the tool. You can specify the source of the identifiers - either the element <unitid>, which usually holds the reference code of an archival object used e.g. when ordering it from the repository, or the @id attribute with the component element <c>, which might hold a unique identifier that has been created automatically following an identification scheme such as DOIs, ARKs, handles etc. Furthermore, you can set the base URL for landing pages other than the digital objects.
  • List of date conversion rules
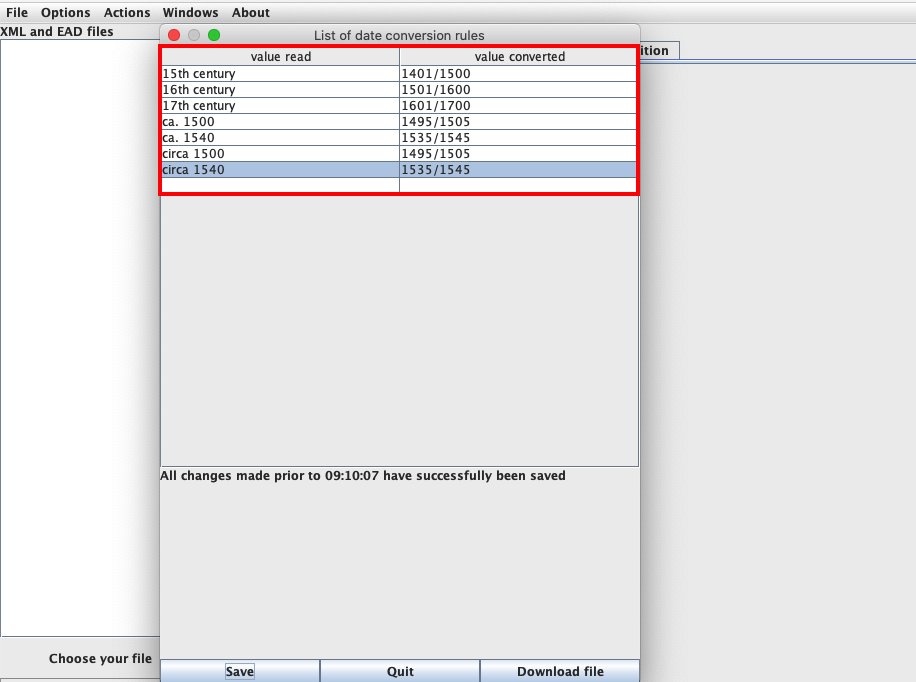
    This option offers the possibility to define which normalisation rules should be applied during the conversion of dates in your files, especially in case of normalising textual dates, where it might not be possible to do this automatically with the default conversion script for apeEAD. In the left column, you indicate the values that will be found in your files and in the right column, you indicate how these values should be normalised. For example, you can indicate that 15th century will be normalised as 1401/1500, ca. 1500 or circa 1500 in 1495/1505, etc.

    These conversion rules can be saved to be re-used later on. You can modify them as often as needed.

    Note that this is an extra possibility to complement the normalisation of dates already done during the conversion by the tool (see annex 2 at the end of this manual for the full list of these conversion rules). These additional rules will take priority over the default rules.
  • Use own stylesheet
    This option allows you to use your own transformation stylesheet (XSLT) in order to run your conversions instead of the default ones. When using this option, a dialogue screen opens where you can select a style sheet from anywhere on your hard drive to copy it in the xsl directory of the tool. The stylesheet then appears in the list in the summary tab and can be chosen to convert your files.
  • Use own schema
    This option allows you to use your own schema (this must be a valid XSD file; other schema file formats are currently not supported). When using this option, a dialogue screen opens where you can select a schema from anywhere on your hard drive to copy it in the xsl directory of the tool. The schema then appears in the list in the summary tab and can be chosen to validate your files.
  • Choose default stylesheet
    With this option you can set the stylesheet that the tool will use by default when doing conversions. The options include all the predefined stylesheets you will find listed in the summary tab (see above) plus any stylesheets of your own that you might have added. When you first start the tool, the default style is the default-apeEAD.xsl, assuming you want to convert finding aids most of the time.
    Use this option e.g. if you wish to use the default-apeEAC-CPF stylesheet on a regular basis, so are using the tool to convert EAC-CPF records most of the time, or if you would want your own stylesheet to be the default.
  • Choose default schema
    With this option you can set the default schema to be used in the tool to validate the files. The options again include all the predefined schemas you will find listed in the summary tab (see above) plus any schemas of your own that you might have added. By default, the tool sets the schema to apeEAD.
  • Checks when loading files
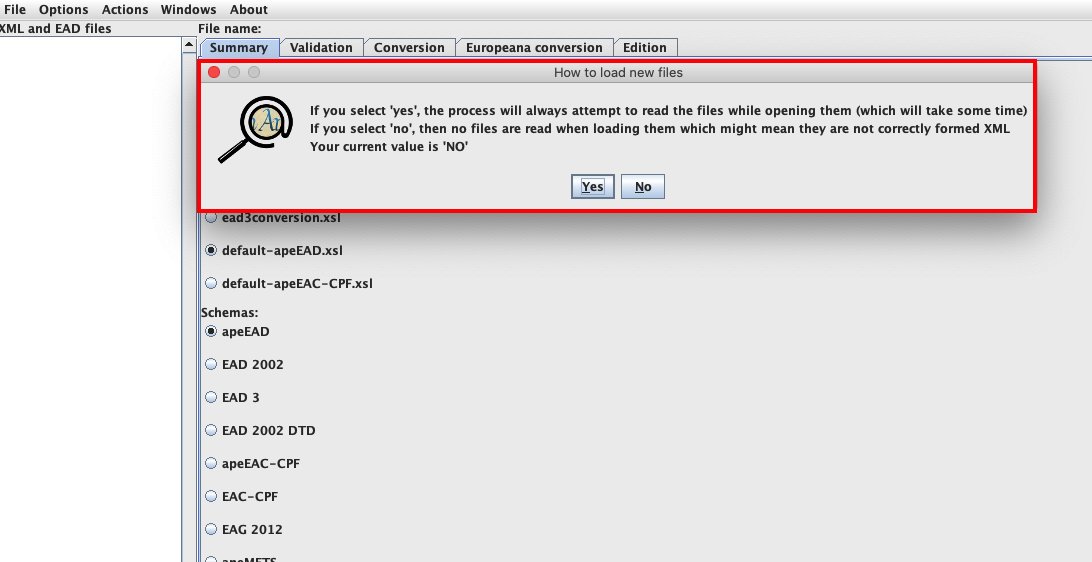
    This option allows you to set the tool to check if the files that you are uploading are valid XML files. Be careful with this option because it might take quite some time if you are uploading a large amount of files. Before displaying the files in the list, the tool parses them and rejects any that are either not in XML format or not well-formed XML files. For each file, a pop-up window warns you and allows you to copy the error message.

    Note, that this is not a validation. I.e. the check performed with this option only confirms the file format and the well-formed status of the XML, but it does not check wether the XML file validates against the default schema that you have selected for the tool. Such validation will have to be done as a separate step once you have uploaded the files into the tool.
  • Default folder for saved files
    The default directory or folder where the tool saves your converted files as well as e.g. any reports on the XML quality is the output folder of the tool (one of the three additional folders created upon first launch of the tool). This option here allows you to change this default folder into another folder on your hard drive.
  • Languages
    The tool is currently available in six languages: Dutch, English, French, German, Greek and Hungarian. The tool will open in the language of your operating system (OS), if it is Dutch, French, German, Greek or Hungarian, and in English, if the language of your OS is set to English or to any other language not available within the tool. This option here offers you the possibility to change the default language, which is useful if e.g. the language of your operating system is English, but your mother tongue is French.

The "Actions" menu

The "Actions" menu has four sub-items:

  • Validate (shortcut: Ctrl+N or Cmd+N) and Convert (shortcut: Ctrl+M or Cmd+M)
    These two options do the same as the Validate button respectively the same as the Convert button in the summary tab.
  • apeEAC-CPF
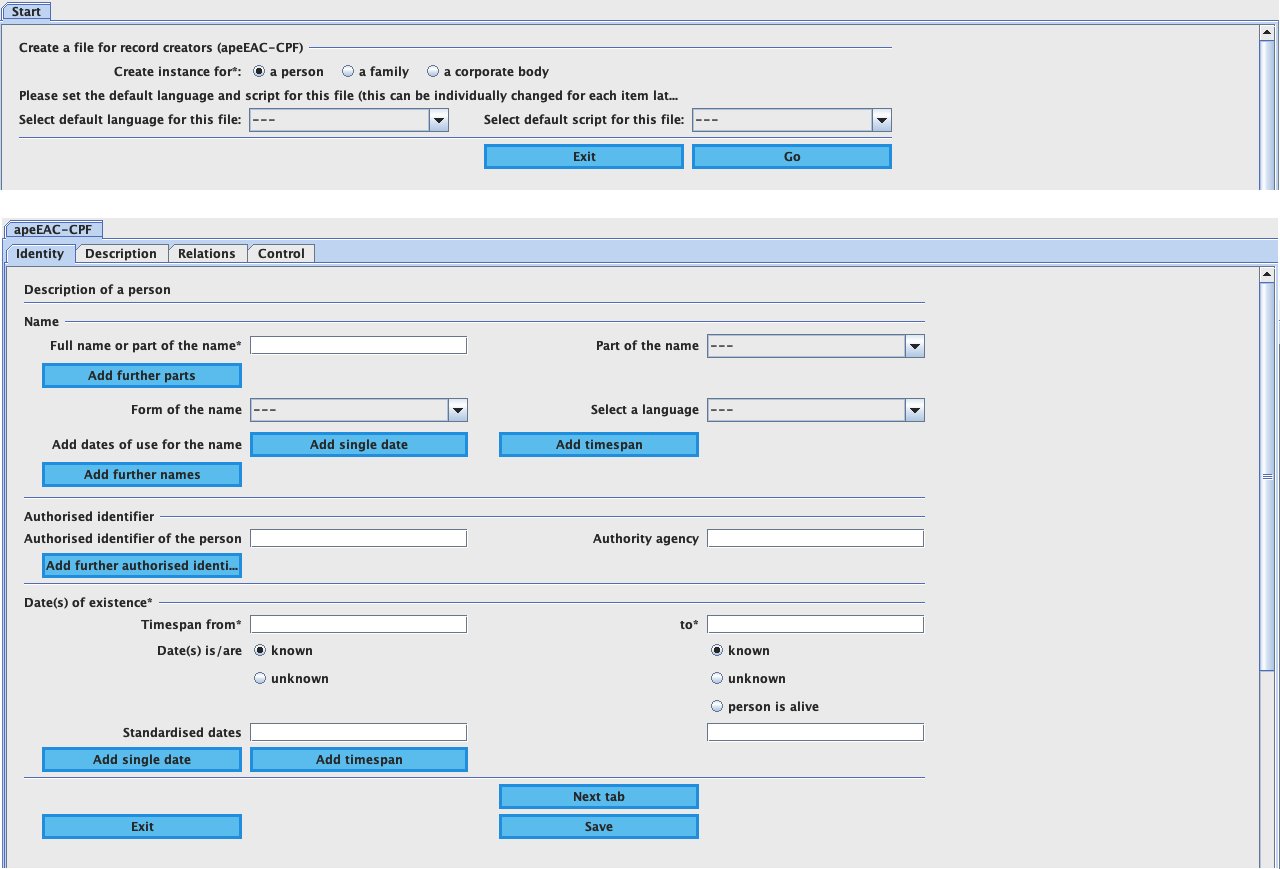
    The option apeEAC-CPF has only one sub-menu: "Create apeEAC-CPF". Clicking this will open a form where you can create an apeEAD-CPF record describing a person, a family, or an organisation ("corporate body"). First you have to confirm which type of entity you are going to describe. It is furthermore recommended, though not required yet at this stage, to define the language and script for your description. Based on your selection of the entity type, the fields in the form that is showing in the next step will be slightly different, e.g. they might have different names or there might be fields available in one version of the apeEAC-CPF creation form that are not available in another. The form has four tabs that correspond to the ISAAR-CPF standard: Identity, Description, Relations, and Control. The Identity tab includes all mandatory fields, while the other tabs can, but do not have to be filled in.

    Make sure to use the "Save" button to save your work while you are in the form as this will make sure that all mandatory elements about the creation of the file will be saved in the background. Use the "Exit" button to close the form. When clicking "Exit" you will again be asked to save your entries and the file will the be available in the list for validation. Please note that there this form is only for creating a new apeEAC-CPF file, not for editing an existing one.
  • EAG 2012
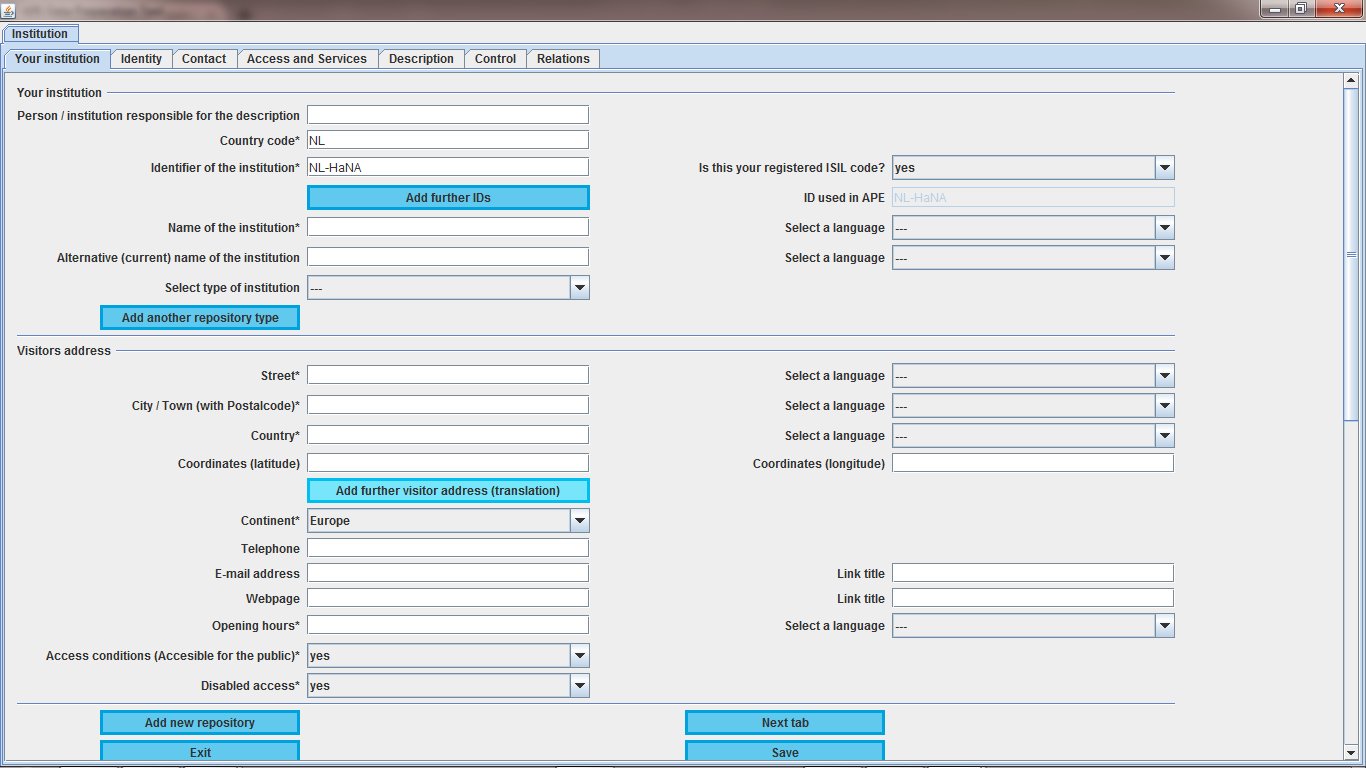
    This option has two sub-menus: "Select an existing EAG (2012) file" and "Create a new EAG 2012 file". The first allows you opening the file that you want to process in the tool (completing or correcting existing elements for example), while the second allows you creating a new file from scratch. In both cases, this will open a form similar to the one used when creating an apeEAC-CPF file. The form is subdivided in seven tabs that correspond to the ISDIAH standard: Your institution, Identity, Contact, Access and Services, Description, Control, Relations.

    You move from one tab to the other by clicking on the "Next" and "Previous" buttons. The tab Your institution includes all mandatory elements, plus some optional elements. Once saved, the EAG file is added to the files in the list and can be validated afterwards.

The "Windows" menu

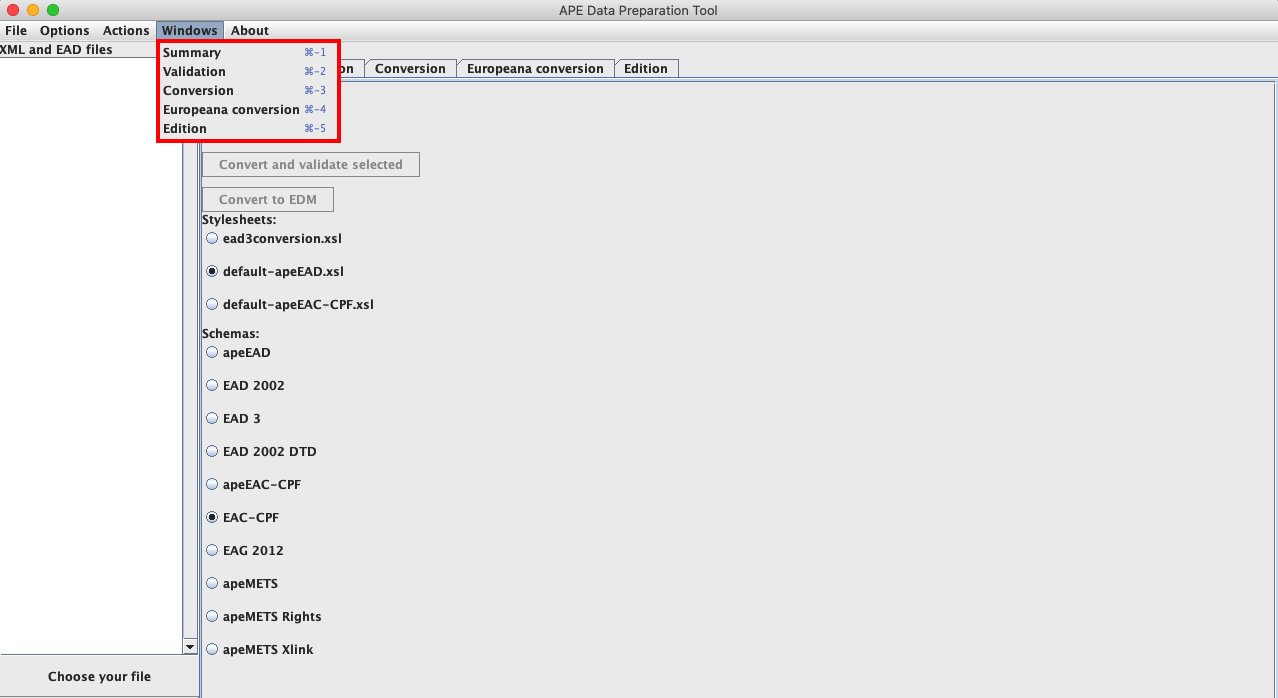
The "Windows" menu has five sub-items that allow you to quickly go to the corresponding five tabs in the right part of the tool's user interface, giving you detailed information on the status of the file(s) listed in the left part of the screen:

  • Summary (shortcut: Ctrl+1 or Cmd+1) lets you jump to the Summary tab>
  • Validation (shortcut: Ctrl+2 or Cmd+2) lets you jump to the Validation tab
  • Conversion (shortcut: Ctrl+3 or Cmd+3) lets you jump to the Conversion tab
  • Europeana conversion (shortcut: Ctrl+4 or Cmd+4) lets you jump to the Europeana conversion tab
  • Edition (shortcut: Ctrl+5 or Cmd+5) lets you jump to the Edition tab

This means that, in order to change to a tab, you can either click on the tab label in the right part of the user interface, select the tab label in this menu or use its shortcut.

The "About" menu

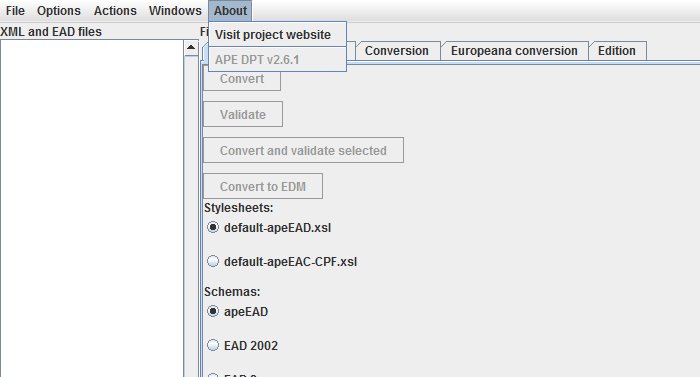
The "About" menu has two sub-items:

  • Visit website for manuals
    This option opens a page in your browser (for which you will need an Internet connection) and will access the Archives Portal Europe's sub-page for tools for content providers.
  • APE DPT vx.x.x
    This option indicates the version of the DPT you are working with. At the opening of the tool, an automatic check for updates is performed. In the screenshot here, this item shows the version of the tool as APE DPT v2.6.1.

The list of files

The list in the left part of the user interface shows the files you process and indicates their status: successfully converted and validated files are shown in green, those with either a conversion or validation problem are shown in red, the ones that not have been processed yet are in black and the ones that have been saved to the output directory (or another folder that you have specified as being the default) have a saved icon in front of them. The file that is currently being processed or the file that you are currently working with will have a green bar showing over it and you will find its more detailed information shown in the tabs in the right part of the screen.

Upload files to the list

By clicking on the menu option "File" and then on the sub-menu item "Select file or directory", you can upload one or several file(s) as well as whole directories (or folders) with all files. Clicking this sub-menu item will open your Explorer (or Finder) window for selection. The last path used when opening files will be memorised by the tool, i.e. if you have last uploaded files from the "Your documents" folder, this is where the Explorer (or Finder) window will open by default. You can select single files that are in sequence by clicking the first file of the sequence, holding the Shift key, and then clicking the last file of the sequence. When selecting single files that are not in sequence, you will have to hold the Ctrl or the Cmd key while clicking each file, one after the other.

If the option "Checks when loading files" is set to "Yes", only XML files are added to the list, and non-XML files, or XML files that are not well-formed, are discarded. It is not possible to load two files with the same name. An according error message is displayed if this happens by mistake and you are asked to cancel the action or overwrite the first file with the second one of the same name.

Remove files from the list

Select the file(s) you want to remove from the list by clicking on its/their name(s) in the list. You can select single files that are in sequence by clicking the first file of the sequence, holding the Shift key, and then clicking the last file of the sequence. When selecting single files that are not in sequence, you will have to hold the Ctrl or the Cmd key while clicking each file, one after the other. Once selected, you can either choose the sub-menu item "Close selected file(s)" from the "File" menu or use the right-click to activate the context menu "Remove file".

Please note, that this will only remove the files from the list as a viewing option within the tool's user interface. Files that you have processed and potentially saved will still be available in the output folder, unprocessed files will still be available in the folder on your hard drive where you have stored them originally.

Functions of the list

Processing files

In order to process a file, or a batch of files, you will first have to make a selection in the list (in the same way as described above for removing files). Then you can use the buttons in the Summary tab in the right part of the screen to either convert, validate or convert and validate the file(s). For any further processing, e.g. conversion to EDM or editing, you will at least have to validate the file(s) first. The radio buttons in the right part of the screen indicate which schema and stylesheet you are going to apply to your file(s). By default, the buttons are selected to convert and/or validate EAD files into and against apeEAD using the default apeEAD stylesheet for conversion.

The action buttons in the right part of the user interface are activated when at least one file is selected in the list and depending on the status of your file; e.g. the button Convert to EDM will only be available for validated apeEAD files.

The same applies to the buttons at the bottom of the list: List controlaccess is activated when at least one EAD file is selected in the list, while Create holdings guide and is only activated when at least one already successfully (converted and) validated EAD file is selected in the list.

Indicating the result of the action processed

When a file has been successfully converted and validated, its colour changes in the list to green. If an error occurred, its colour changes to red. The same goes for the colour of the tab corresponding to the process conducted.

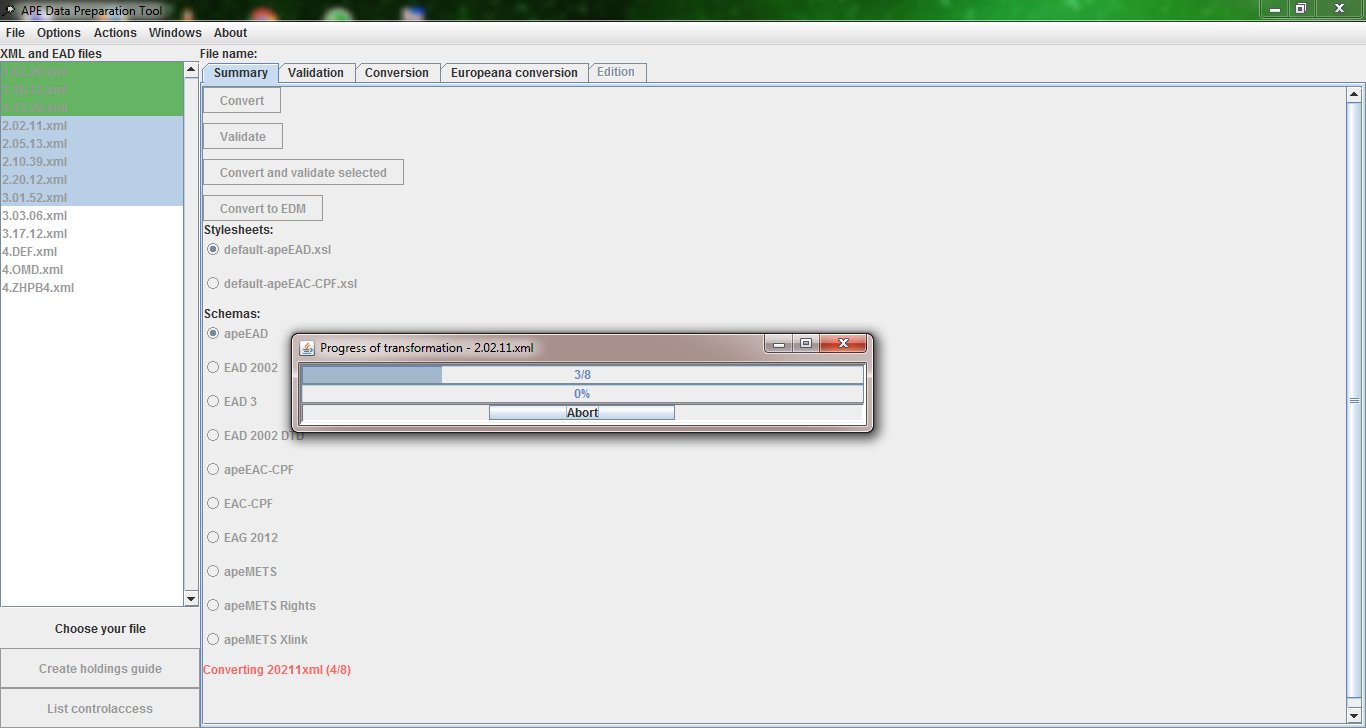
When you are processing large files or a lot of files at the same time, the progression and status of the operations will be shown via a progress bar. You can stop the process whenever you want by pressing the "Abort" button that is available in the progress bar while the process is running.

Please note that after pressing the "Abort" button, the tool will finish its last operation before stopping, i.e. if you hit "Abort" while the tenth file in a batch of 20 is being converted, this conversion will finish and the process will only be stopped before the eleventh file is taken into account.

Saving files

To save your converted and/or validated file(s), you will have to select the file(s) in question again then choose the option "Save selected APE file(s)" in the "File" menu. Once the file(s) has/have been saved, a notification will show in the tool's user interface and the saved file(s) is/are marked with a small saved or disk icon in front of the file name in the list.

By default, files you save will be stored in the output folder, unless you have chosen a different location for this via the option "Default folder for saved files" in the "Options" menu.

If the file is valid, the file will be saved and renamed to "ape{schema_used}_{original_filename}.{original_extension}" and an according message will be shown. If the file is not valid, the file will be saved and renamed to "NOT_ape{schema_used}_{original_filename}.{original_extension}" and an according message will be shown. "{schema_used}" can be "EAC-CPF", "EAD", or "EAG".

Examples: APE_CPF_sample_person.xml or NOT_apeEAD_16b75fbc-6e9d-468c-acbe-f47dfe03a8c1.xml or EAG_DE-123456789.xml.

The tabs

The "Summary" tab

The first and main tab of the five tabs in the right part of the user interface is the "Summary" tab, which is opened by default when you start the tool. This is where you can apply operations to your XML files. When a file is selected in the list, you can, from this tab, convert the file to the Archives Portal Europe format, pass it to the validator or convert it to be compliant with the Europeana Data Model (EDM). You have the possibility to choose the stylesheet to be used for the conversion, including your own if you have uploaded one. The same goes for the schemas.

Please note that the action buttons and radio buttons are available only if the action is possible for the selected file.

The "Validation" tab

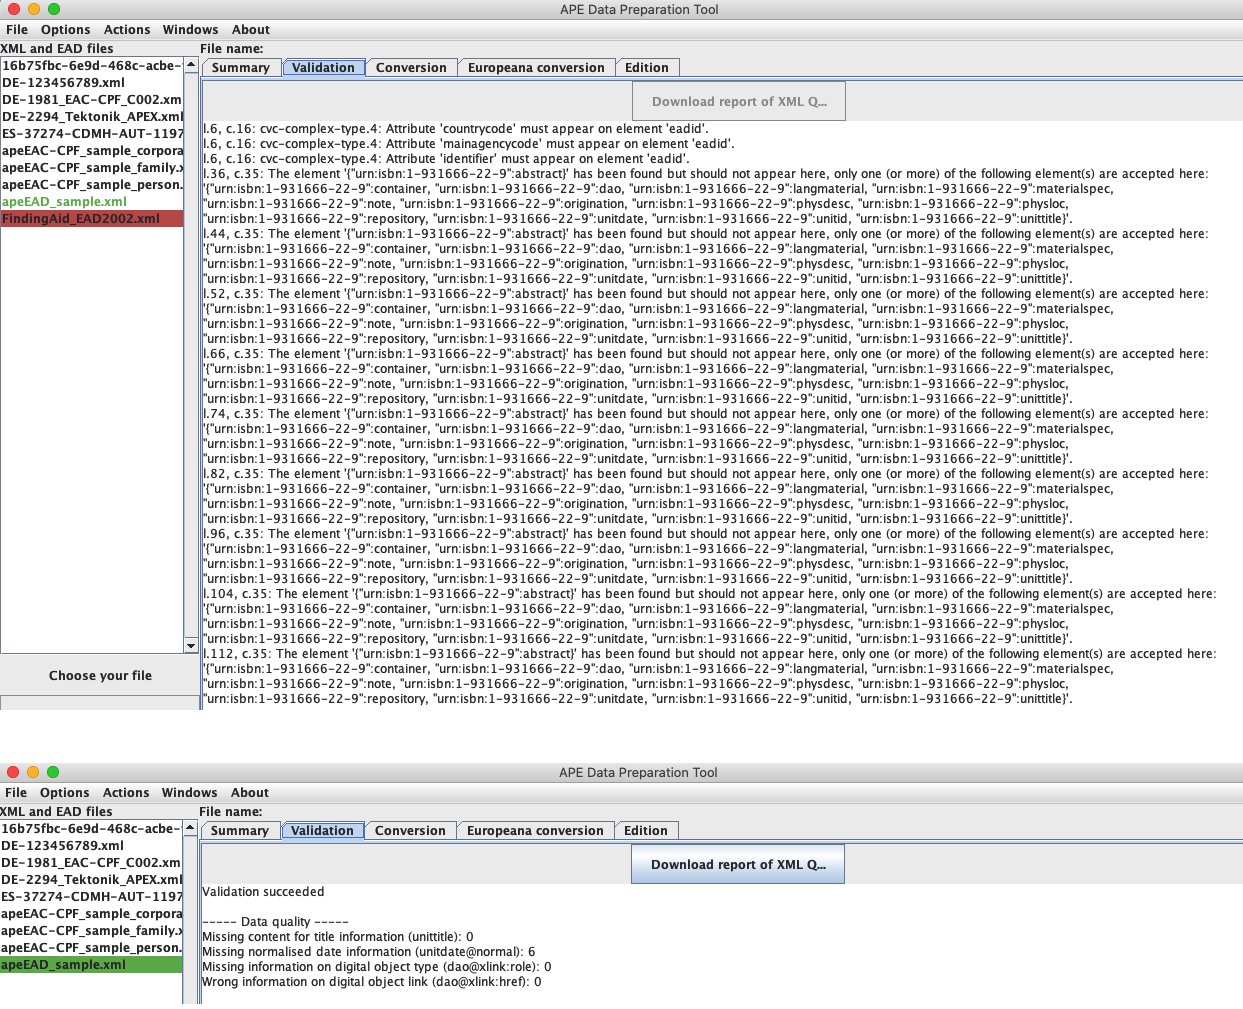
The second tab is the "Validation" tab. In this tab you will find the results of a validation for the selected file. It can either contain a sentence saying the validation succeeded, show an error message, or a list of all the errors found during the validation process, with the indication of the lines and columns where the errors have been found. You can find a list of the possible errors, their meaning and the actions to be taken to avoid them in Annex 1 of this manual further down below. In general, validation errors - especially when validating against one of the Archives Portal Europe's application profiles, like apeEAD or apeEAC-CPF - do not necessarily mean that your file(s) need(s) correction, but they might also simply point to differences between Archives Portal Europe's use of these standards and yours.

Please note that if you validate a file before the conversion, the lines indicated in the error report will be the ones of your original file, but if you validate a file after the conversion, the lines indicated will be the ones of the newly converted file, therefore will not correspond exactly to your original file. In that case it is best to save the file to the output folder for evaluating the error message.

In case of a successful validation of a finding aid, a report on the data quality or completeness of the file will be displayed, indicating the number of missing or wrong information for four EAD elements, which are highlighted here as they either help in data discovery or point to issues that might impact on the usability:

  • Missing content for title information (unittitle)
  • Missing normalised date information (unitdate@normal)
  • Missing information on digital object type (dao@xlink:role)
  • Wrong information on digital object link (dao@xlink:href)

This information can be downloaded via the button "Download report of XML QUALITY" available at the top of the tab. The report is saved in the output folder of the tool. To save this information for several files, you have select them in the list and then use the same command from the "File" menu. You can improve the data quality of your files by editing them or by adding rules for date conversion and by indicating the digital object type.

The "Conversion" tab

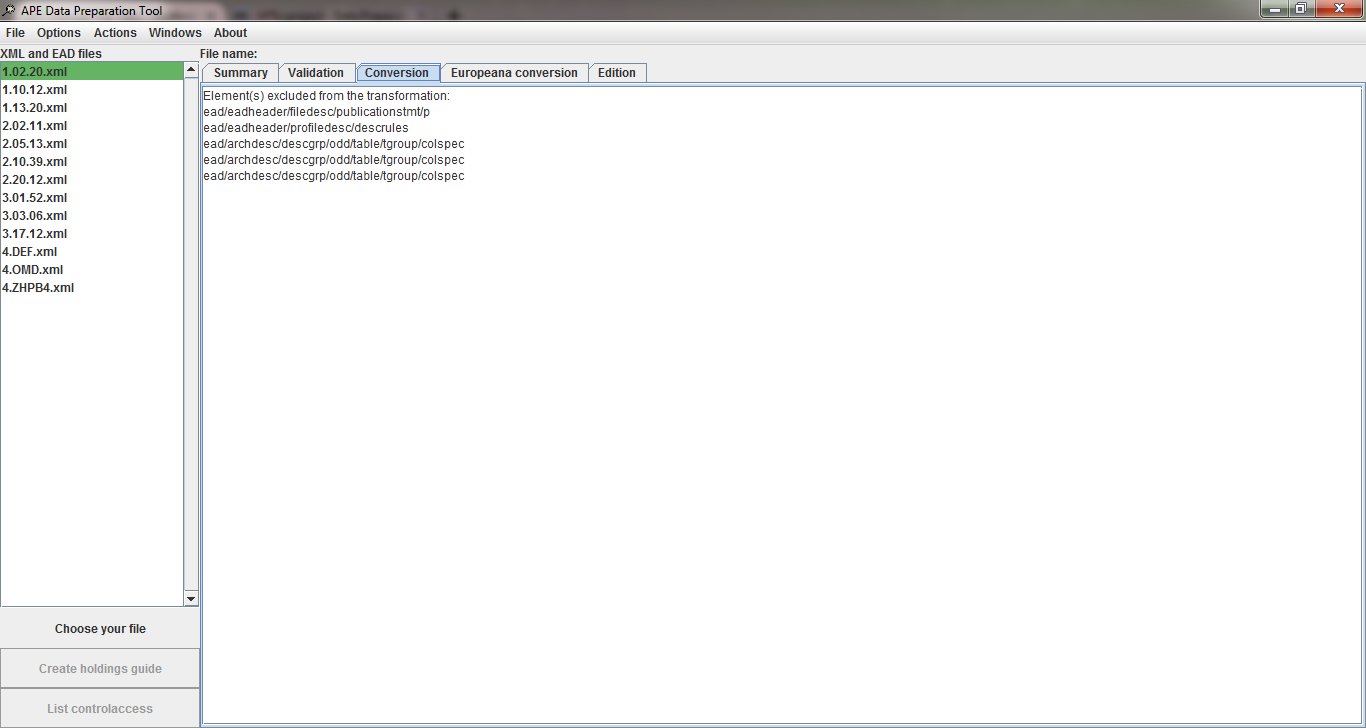
The "Conversion" tab will display information on the transformation performed on the files and the problems encountered:

  • For finding aids, the tab lists the elements (and their attributes, if applicable) that have been excluded either because they are not recognised by the tool or because they do not comply to the apeEAD profile which is more restrictive than the general EAD 2002 standard.
  • The tabs also indicate potential problems due to the c-element hierarchy, when a c-level is not understood.

Note that the conversion tab does not list all changes made to the file, but only the elements discarded during the conversion.

The "Europeana conversion" tab

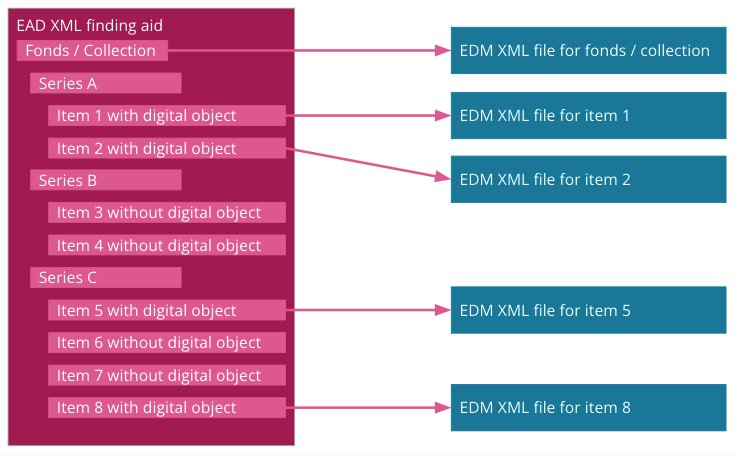
The "Europeana conversion" tab displays information on the EDM conversion, which in this case mainly mean a green highlight when the conversion to EDM has succeeded and a red highlight when the conversion has failed. Files that are transformed into EDM format are automatically saved in the output folder (or an alternative folder chosen as the default for saved files). There will be a folder named with the identifier of the overall collection described in the finding aid you have converted, including a separate EDM XML file for the collection itself plus one for each of its components that link to a digital object. Components that do not lead to digital objects as well as intermediate hierarchical levels will not be taken into account for the EDM conversion as Europeana will not be able - respectively will not want - to show these in their display. For more information regarding the conversion to EDM, see the EDM conversion part of this manual further down below or the separate explanation of Converting archival metadata to EDM.

The "Edition" tab

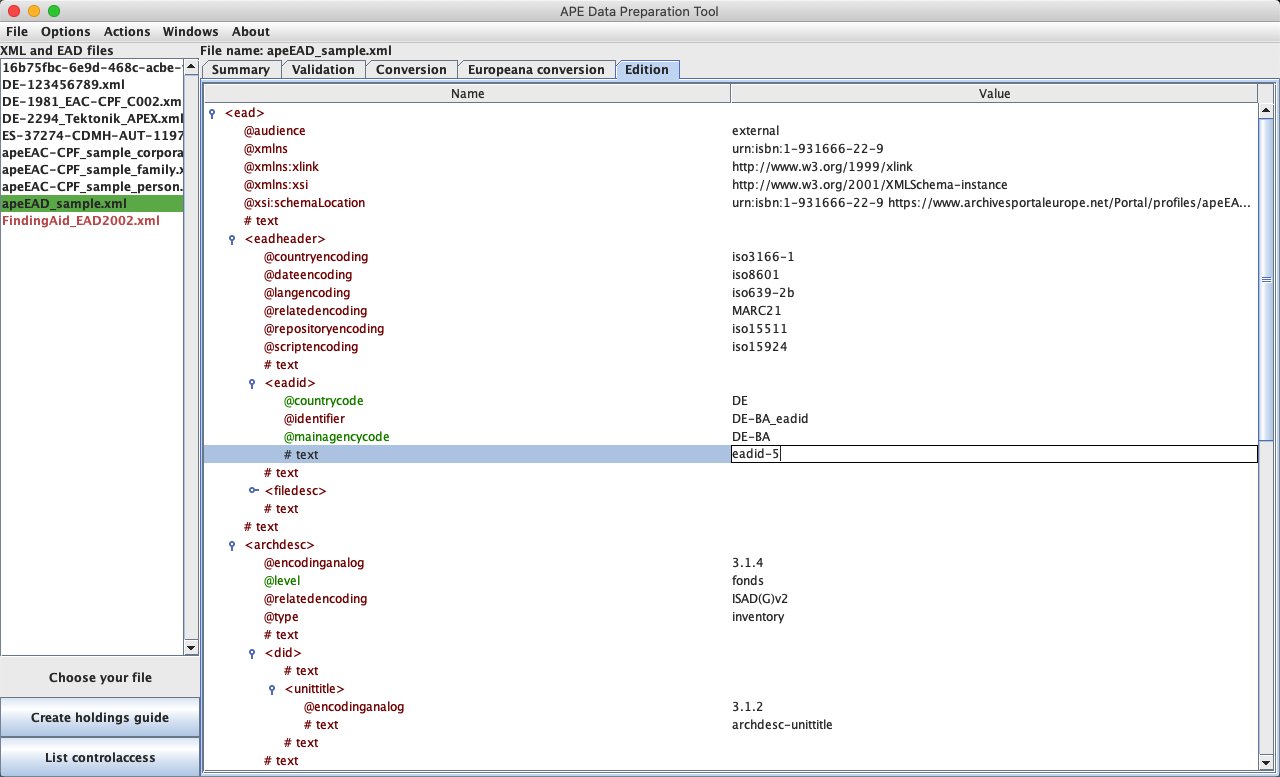
The "Edition" tab is only available for EAD files. It will read the file selected in the list and display it in a tree like view showing its EAD XML hierarchical structure. Only some elements can be edited in the tool, they are marked in green or blue:

  • eadid @mainagencycode, the identifier of the institution responsible for the creation and maintenance of the EAD finding aid
  • eadid @countrycode, the two-letter country code for the country where this institution is located
  • eadid / text, the identifier of the EAD finding aid
  • titleproper / text, the title of the EAD finding aid
  • langusage / language, the language code for the language of description
  • langusage / language / text, the full name of the language of description
  • unitdate@normal, the normalised date of creation
  • langmaterial / language, the language code for the language of the material
  • langmaterial / language / text, the full name of the language of the material
  • @level, the level of description for the highest level in the EAD finding aid and for its components

The <eadid/> element is mandatory to validate your file and needs to have content in order to be processable within Archives Portal Europe. The same applies to the element <titleproper/>; if left empty, the default text "No title specified" will be displayed in Archives Portal Europe. Normalised dates are useful for the display and refinement of the search results.

Please note that the tool will only allow you to edit information that is already there, but not to add information during the process.

Additional functionalities

Same as the Archives Portal Europe's dashboard, the Data Preparation Tool offers further functionalities which are not really necessary for the basic workflow of uploading, processing and publishing finding aids, but provide additional value, for individual institutions as well as for the portal. For the corresponding functionalities in the dashboard, see the Institution Manager manual.

Creating a holdings guide

The button "Create holdings guide" below the list becomes available once at least one valid apeEAD file has been selected. While not required, it is recommended to have saved your finding aids before you start this process.

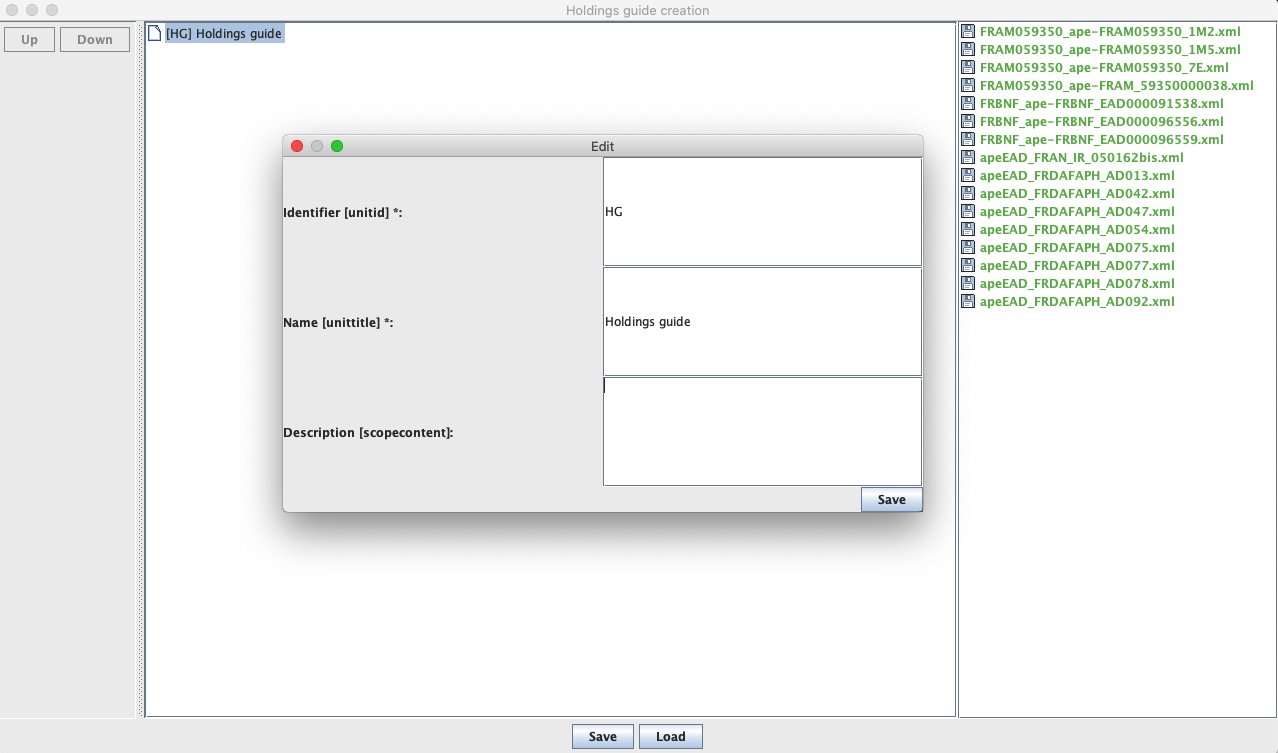
Clicking the button opens a new window, divided into three parts:

  • on the right you see the list of the finding aids you have selected to be connected to the holdings guide,
  • in the middle you will see the tree structure of the holdings guide appear once you start building it,
  • on the left you have access to ordering buttons ("Up"/"Down").

An extra input form is shown on top of this screen, where you are asked to provide some information to describe your holdings guide: Identifier (<unitid>), Name (<unittitle>) and Description (<scopecontent>). The first two are mandatory, the latter is optional.

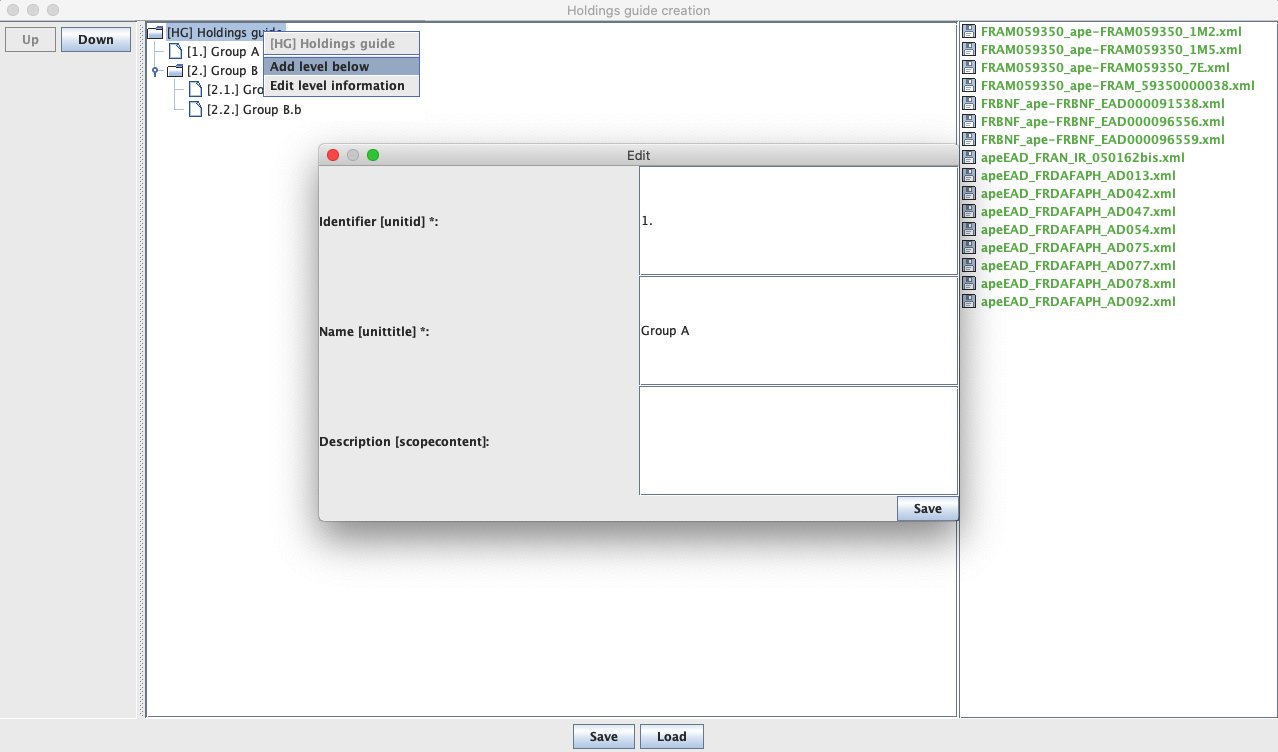
Once you have created this 'root' node of the holdings guide, you can use the same functionality to expand this any further to a structured hierarchical tree. Simply select the node where you would like to expand from, e.g. the root node to start with, and right click. This will give you the option to either "Add [a] level below" or to "Edit [the current] level information". For each additional level that you create, you will again have to provide the same information (Identifier and Name) and you can, if wanted, also add a Description for these lower levels. You can create as many levels and sub-levels as needed to organise your holdings guide - the structure will be displayed in the middle part of the screen as a tree, but you can also decide to simply add all of your finding aids directly to the root node without creating and sub-levels.

When you are content with your hierarchy, you simply drag and drop the files from the right into the corresponding levels - either one by one or in groups. If you need to re-arrange the hierarchy or the order of single files, you can do so using the Up and Down buttons on the left. Moving an entire level to another level can be done via drag and drop. You can also remove a level or a file by right-clicking the level of which they are part of. In the case of removing a file, this will afterwards be available again in the right part of the screen for further use.

Once all finding aids have been inserted into the holdings guide structure, click the Save button. This will bring you back to the "Summary" tab, where the newly created holdings guide is shown at the bottom of the list and can now be validated as a final step of confirmation and saved, e.g. for upload into Archives Portal Europe.

The newly created holdings guide has the following characteristics:

  • the information for the root level is used for the identification of the EAD file as a whole (eadid, titleproper) and with the archdesc-level,
  • the information provided for each level (Identifier, Name and Description) is transformed into c-levels with the three corresponding EAD elements (unitid, unittitle and scopecontent),
  • the information for the c-levels representing the finding aids that have been connected to the holdings guide is retrieved from the archdesc-levels of these files (again for the elements unitid, unittitle and scopecontent) , while the <eadid> of each finding aid becomes part of the otherfindaid/extref-element used in the holdings guide to actively linking to the finding aids.

Note: when saving the holdings guide, a serialised file is also saved in the output folder. This ".ser" file can serve as a basis to further modify or complete the holdings guide, if it has not been overwritten or moved from the output folder. In the tool, after clicking the "Create holdings guide" button, simply click the Load button at the bottom of the screen.

Describing your institution - the EAG creation form

EAG, the Encoded Archival Guide, is based on the ISDIAH standard and is used to describe institutions with archival holdings. You can find more information on EAG in our "Standards" section. In the DPT, you can access the EAG creation form via the "Actions" menu and the sub-menu items "EAG 2012" and "Create a new EAG 2012 file".

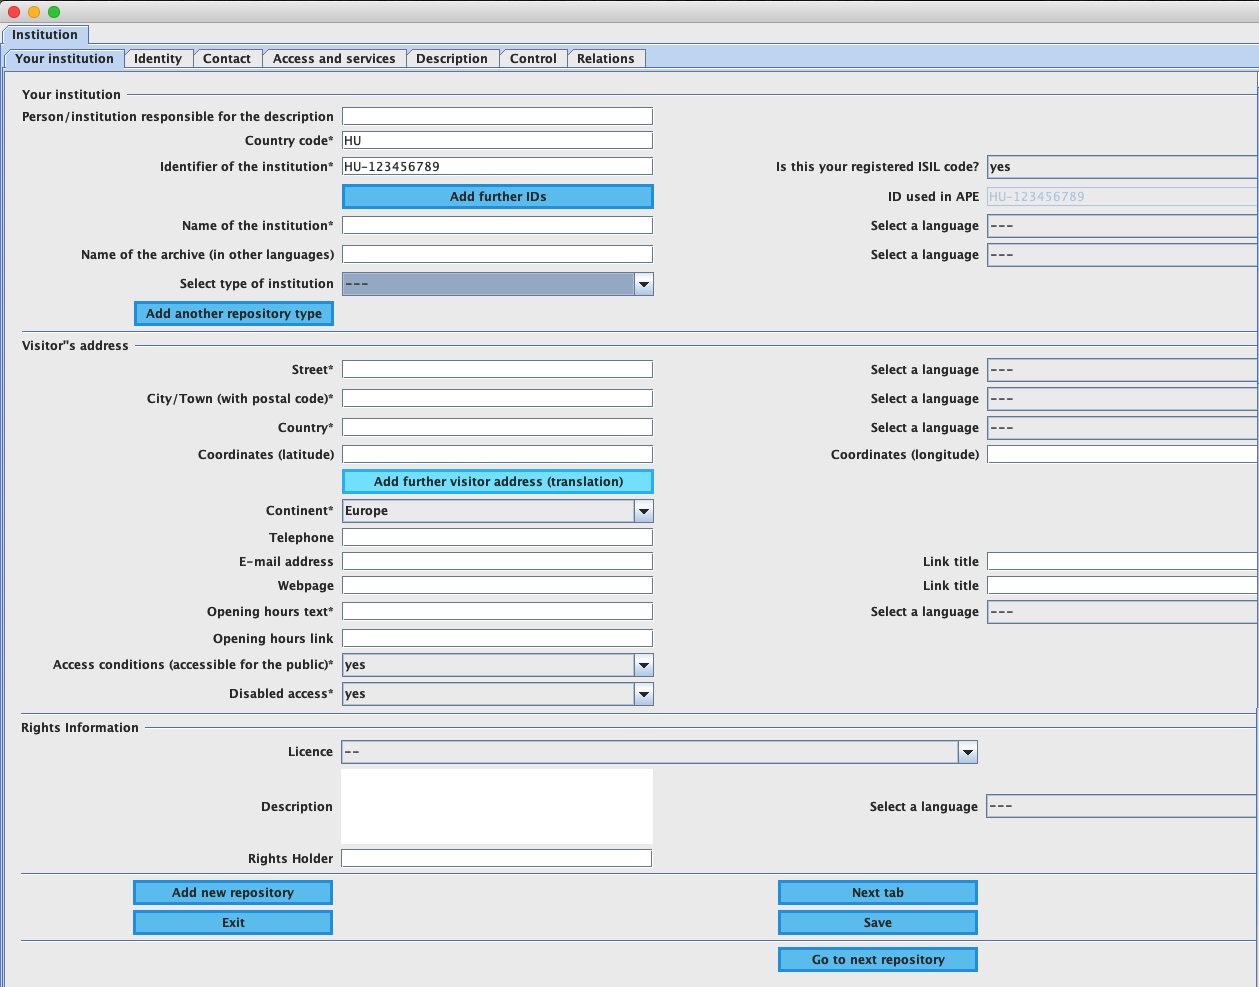
The form has seven tabs. The first tab, Your institution, contains all mandatory elements required to create a valid EAG file. For most fields you can provide information in several languages if wanted, e.g. in your own language and in English, therefore you have the possibility to select a language on the right of these fields. You can move from one tab to another by clicking on the Next tab/Previous tab buttons and you can save your file from any of the tabs by clicking the Save button without going through all tabs. The Exit button closes the screen (and asks for saving it in the process). Once you have created your EAG file, you have to validate and save it in order to upload it in the Archives Portal Europe's dashboard.

The Your institution tab

The first part of this tab asks for basic information on your institution:

  • Person/institution responsible for the description: this field is optional. In case this field is left empty, a standard value ("automatically created agent") will be used later on in the EAG XML output, but will not be displayed when uploading this to Archives Portal Europe.
  • Country code: this mandatory field is pre-filled with the two-letter country code which you provided when you started using the tool (or have set later on via the "Options" menu).
  • Identifier of the institution: this mandatory field is pre-filled with the identifier of your institutiion, which you provided when you started using the tool (or have set later on via the "Options" menu). In case this identifier is a registered ISIL code or a unique code within your country, answer the question "Is this your registered ISIL code?" with "yes". After uploding this file to the Archives Portal Europe, this identifier will then also be used there as the identifier for your institution. Otherwise, please answer with "no". The tool will then create a placeholder value as identifier ([country code]-99999999999), which the portal will recognise and replace with an automatically created and unique identifier for use in Archives Portal Europe when uploading your EAG file.
  • Name of the institution: this field is mandatory and has to hold the authorised, full name of your institution.
  • Parallel name of the institution: this field is optional. If there is another name for your institution which can be used in parallel to the actual name, you can add it here. This can also be a translation of your institution's name in various languages.

The next part of the tab deals with the location of and access to your institution. Here the address fields Street, City/Town (with postal code), Country, Continent, Opening hours and information whether your institution is accessible to the public and whether it provides specific services for disabled users are mandatory.

You can provide several visitor and postal addresses for your institution and if you wish you can translate them in other languages and/or scripts. Furthermore you can add:

  • Coordinates: these fields hold the coordinates of a visitor address. Any longitude or latitude value should be provided as decimal numbers. For example, a location on 50°30' N latitude and 12° E longitude would be provided as 50.5 and 12.
  • Telephone: it is recommended to use the ITU-T standard E.123 for printed representation of telephone numbers, i.e. the plus sign +, country code, area code, telephone number. E.g. +33 1 40 27 60 00.
  • E-mail address: please note that if you don't provide a text for the Link title to the right of this text field (by copy-pasting the e-mail or entering a descriptive text), the default English text "Send an e-mail" will be displayed when uploading this to Archives Portal Europe.
  • Webpage: please note that if you don't provide a text for the Link title to the right of this text field (by copy-pasting the url or entering a descriptive text), the default English text "Go to our homepage" will be displayed when uploading this to Archives Portal Europe.
  • Opening hours: while this field is mandatory, you can also use it to e.g. include a standard text such as "See our website for opening hours" and then provide an Opening hours link in the field below. When using the EAG form to describe a website, webservice or portal, it is recommended to enter "not applicable" (in English and/or your own language) or "24/7".
  • Accessible to the public: this mandatory field is pre-filled with "yes". If your institution is not open to the public, please select "no" instead. The displayed text when uploading this to Archives Portal Europe will be "Accessible to the public" respectively "Not accessible to the public".
  • Disabled access: same as the previous one, this will be pre-filled with "yes", which can refer to e.g. the reading room being on the ground floor or reachable via an elevator or to some computer being fitted with braille display. In the fourth tab, Access and services, you can describe these services in more detail.

The last part of this tab allows you to provide rights and licensing information with regard to the metadata in your EAG file, i.e. to the information used in describing your institution. You can choose from a selection of Creative Commons licences and rightsstatement.org statements (see more on available licences in Archives Portal Europe) and you can also provide a description of what a specific licence means in terms or use and re-use of the information in your EAG file and name the rights holder in case the information is indeed subject to copyright.

Providing rights and licensing information for the metadata is highly recommended, even though only optional in the DPT. However, when you intend to upload your EAG file to Archives Portal Europe, you will be asked to provide this information latest at that point, as all metadata in Archives Portal Europe is required to be marked with licensing information.
At the bottom of the Your institution tab, you will also find a button saying Add new repository. Use this button, when describing several departments/locations/repositories of the same institution within one EAG file. Some of the mandatory information in this first tab will then be copied into a second set of tabs, where you can edit and add information specific to a second repository.

The Identity tab

In this tab you can expand the basic information which you provided in the Your institution tab with regard to adding further names of your institution as well as specifying the type of institution.

The Contact tab

This tab is also pre-filled with information you already entered in the Your institution regarding address and contact details. You can now expand on this information, for example by adding additional visitor and/or postal addresses, telephone and fax numbers, e-mail addresses, and webpages.

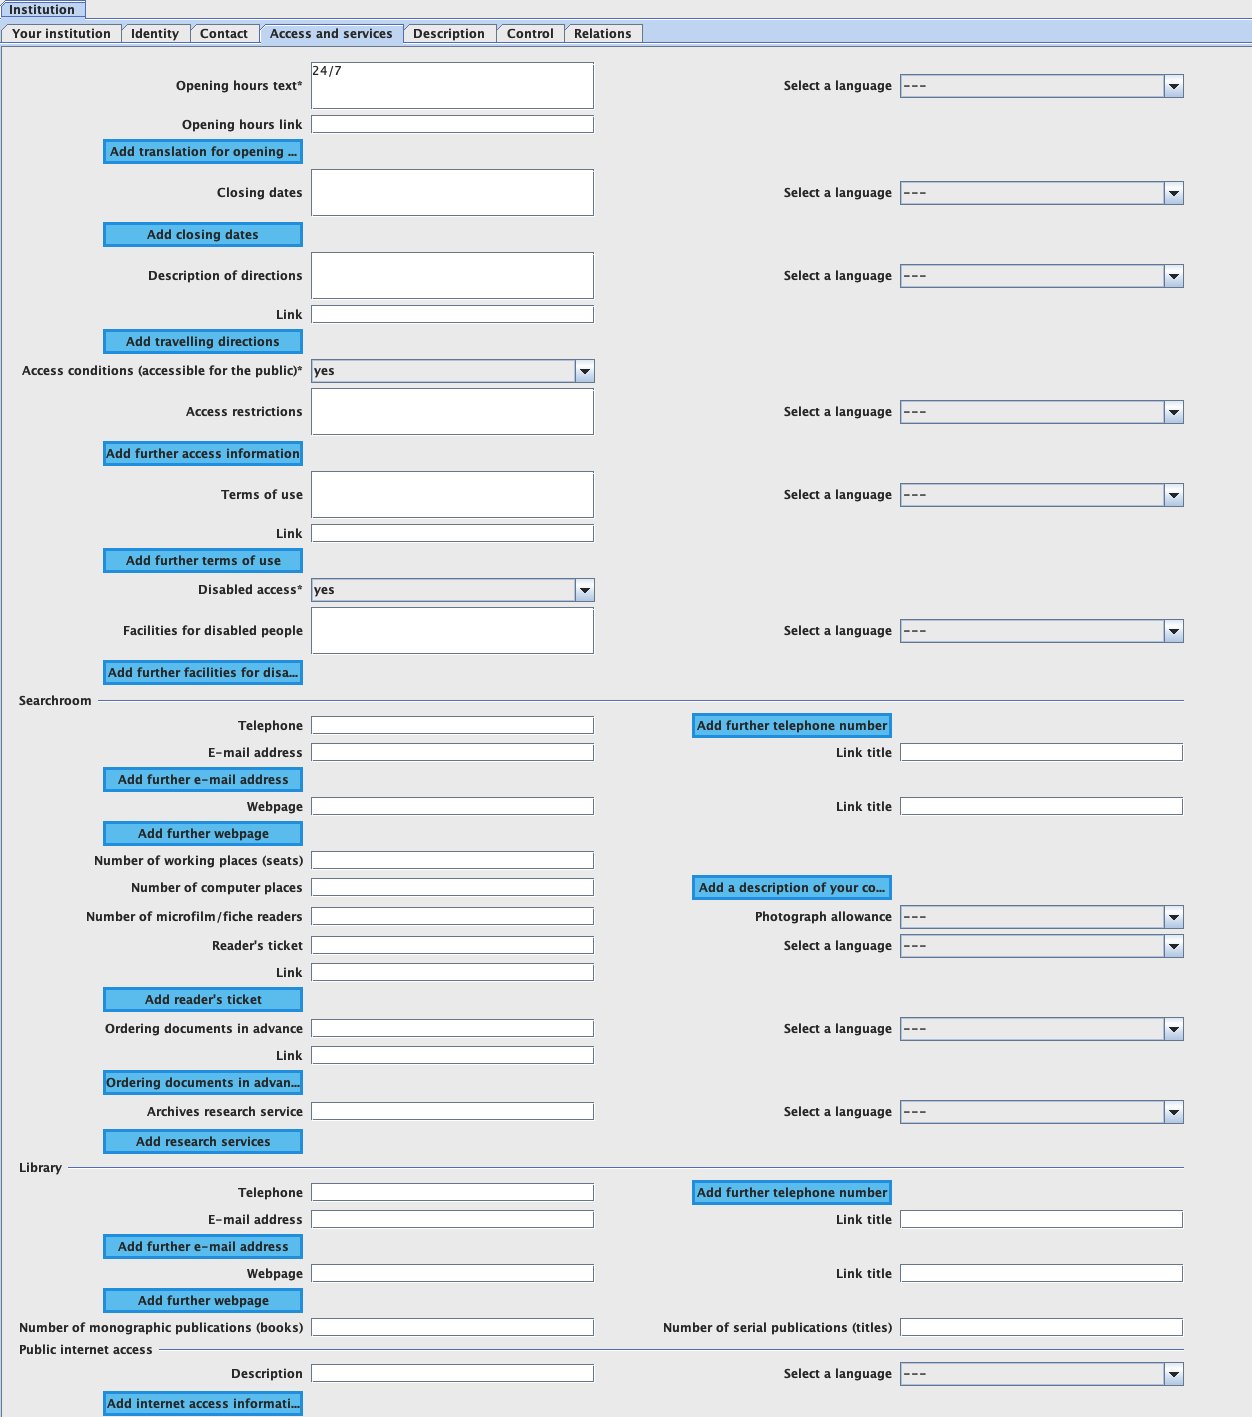
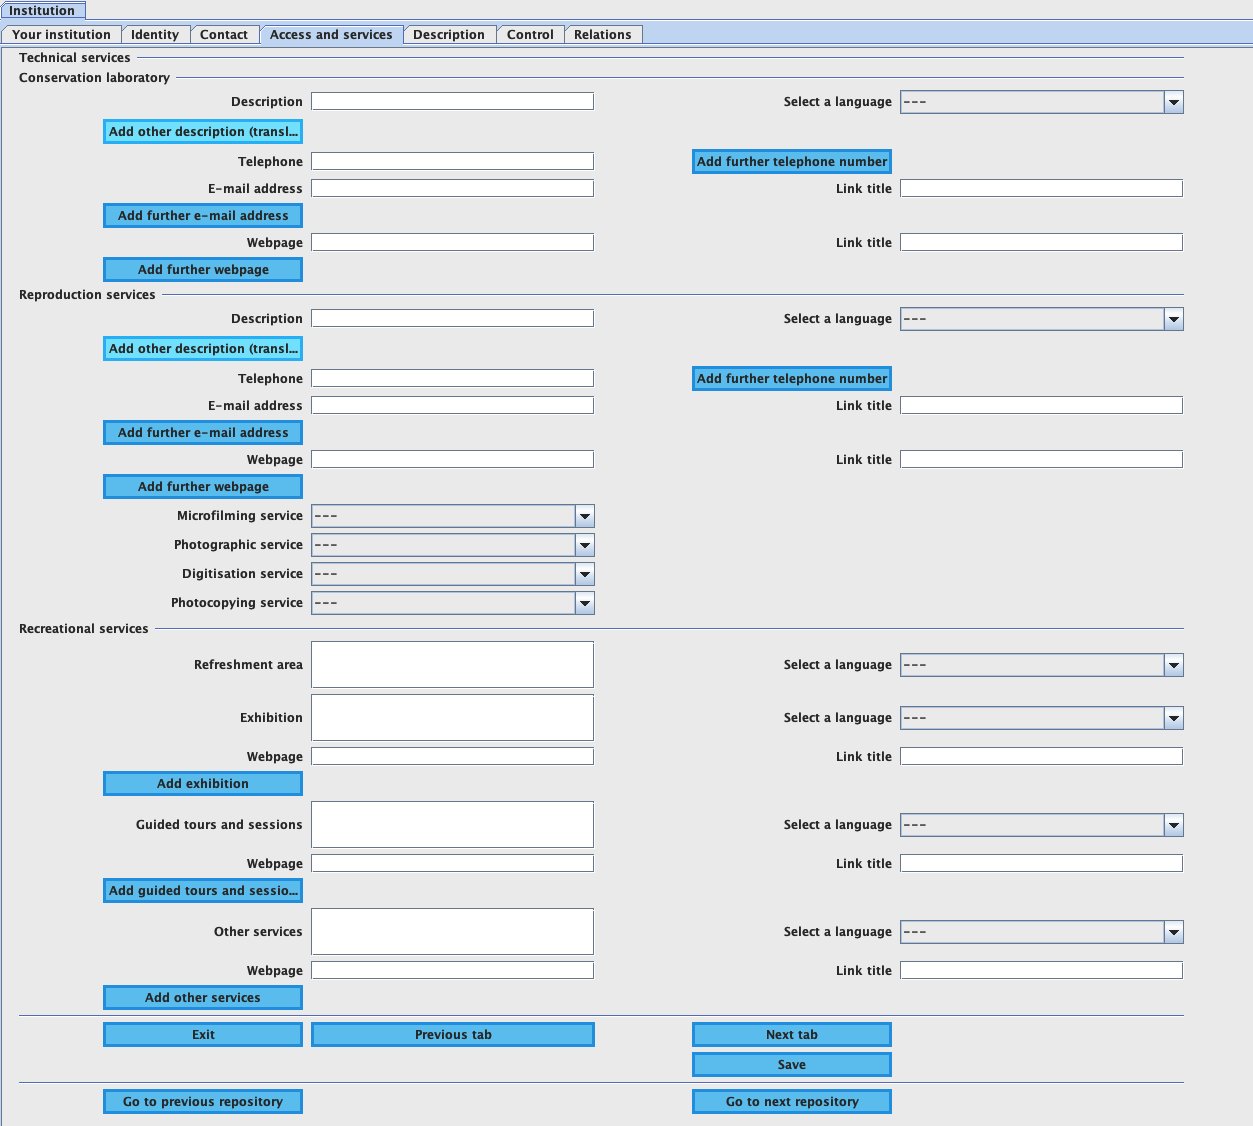
The Access and services tab

This tab is divided into several subsections. Relevant information given in the Your institution is automatically pre-filled here. Most of these fields are repeatable to enter variations or translations if wanted.

In the first part of this tab, you can, for example, add further details and explanations on the general statements regarding public Access and Services for disabled users. You can also add specific Closing dates, give Directions (in writing and/or in the form of a link) and describe - or link to - your institution's Terms of use.

In the second and third parts of this tab, you can provide contact details (telephone, email address, webpage) as well as further information on your institution's Search or reading room and Library, if applicable.

You can e.g. mention the number of Working places in the reading room overall and specify how many of these are fitted with a computer or microfilm/microfiche reader, you can add information on acquiring a Reader's ticket, on Ordering documents of interest in advance to a visit, and on any Services for researchers that your institution might offer. You can also provide the number of Monographic and serial publications available in your institution's library.

In the fourth to sixth part of this tab, you can furthermore add information about technical services, such as a Restoration laboratory or any Reproduction services your institution might offer, and about recreational services, from a Café or restaurant to Exhibitions (online and on-site), Guided tours and more. For the first two, you can provide a description of the services offered by your restoration laboratory and reproduction services as well as direct contact details if applicable. You can also specify, whether reproduction services include microfilm, photographic, digitisation, and/or photocopying.

For the recreational services, you can again include a descriptive text and you can also add a link where available and suitable. Each of these services can be repeated as often as wanted to either add several of the same type of service or to provide the information about the same service in several languages.


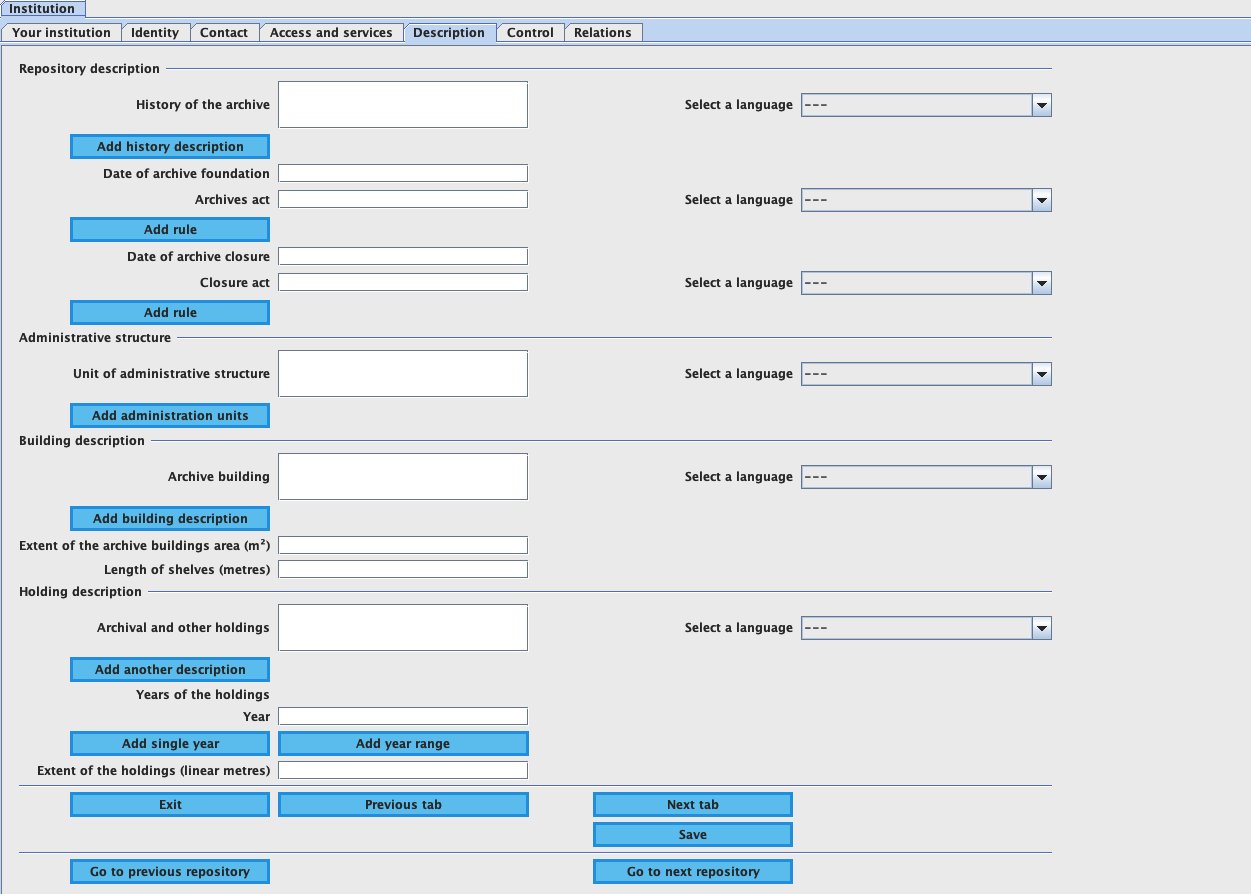
The Description tab

This tab gathers all information about the archival institution itself and about its holdings:

  • History of the archive: can hold a paragraph about the history of the institution. You can either provide a short summary in just one paragraph, or you can add repeated paragraphs for a longer description.
  • Date of archive foundation: the date of the foundation of your institution. You can add a link to the foundation act. If there are multiple foundation acts, you can add these via the Add rule button.
  • Date of archive closure: the date of the closure of your institution, in case you are describing an institution - or a repository as part of an institution - that has been closed or superseded by another institution. You can add a link to the closure act. If there are multiple closure acts, you can add these again via the Add rule button.
  • Administrative structure: a short description of the administrative organisation of your institution; you can use the Add administrative unit button to name each part or department of your institution.
  • Building description: add one or more paragraphs describing the building(s) where your institution is located. This might be of interest, when your institution is e.g. in a building that previously has been used for other purposes or has any special architectural features. This section can also hold information on the Extent of your storage facility (in m²) and of the Length of shelves (in linear metres). The unit of measurement is added automatically in the display in Archives Portal Europe, so provide only a number here when intending to upload this later on.
  • Holdings description: here you can describe your holdings in general, provide the Date ranges they cover, as well as the Extent of your holdings (in linear metres). You can add any years, year ranges and combination of both by using the Add single year and Add year range buttons.
The Control tab

This tab can hold information on the scripts, languages, rules, conventions and other standards used in creating your EAG file. Most of the fields are pre-filled but you can add more languages/scripts and/or rules by clicking the appropriate buttons.

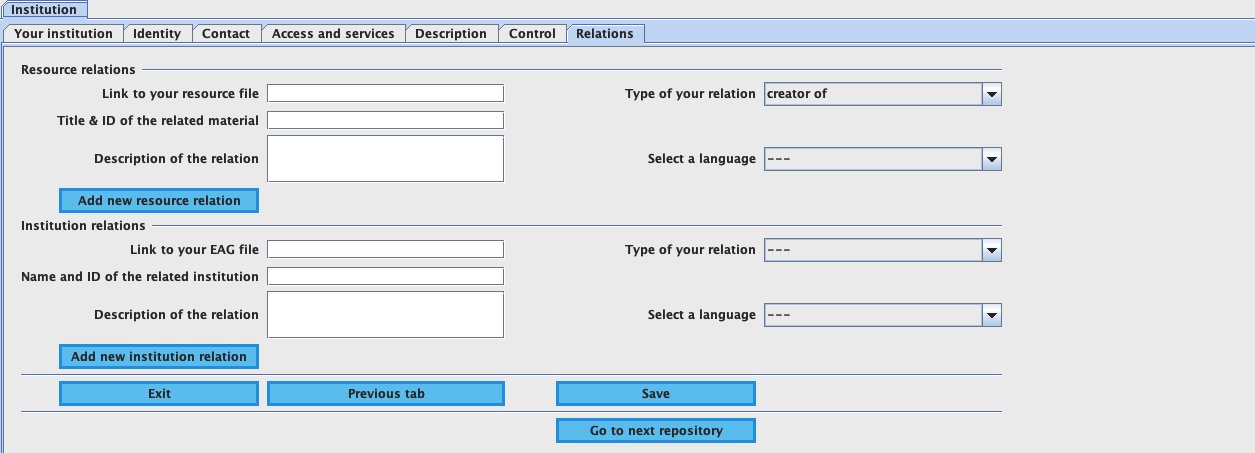
The Relations tab

In this tab you can add information on all kinds of relations your institution might have:

  • The Resource relations sub-section can hold links e.g. to your holdings guide and other online or offline resources created by or about your institution as well as a short description of these resources. The type of the relation, "creator of", "subject of", or "other", can be indicated via the drop-down list to the right of the resource relations information.
  • The Institution relations sub-section is meant to link your institution to other institutions. You can give the name and identifier of the related institution, you can specify the type of the relation ("hierarchical (child)", "hierarchical (parent)", "temporal (earlier)", "temporal (later)", or "associative") and you can describe the relationship in more detail.

Describing records creators - the apeEAC-CPF creation form

EAC-CPF, Encoded Archival Context - Corporate Bodies, Persons, and Families, is based on the ISAAR(CPF) standard and is used primarily to describe organisations, persons, and families that have created, maintained, and used archival records. You can find more about EAC-CPF and its use in Archives Portal Europe in the form of the application profile apeEAC-CPF in our "Standards" section.

In the DPT, you can access the apeEAC-CPF creation form via the "Actions" menu and the sub-menu items apeEAC-CPF and Create apeEAC-CPF. At first, you will have to indicate what kind of entity you want to describe, a person, a family or a corporate body, and you will be asked to include the language and script in which you want to describe it. The latter is optional at this stage, but you will need to add it later on anyway in order to be able to save the file.

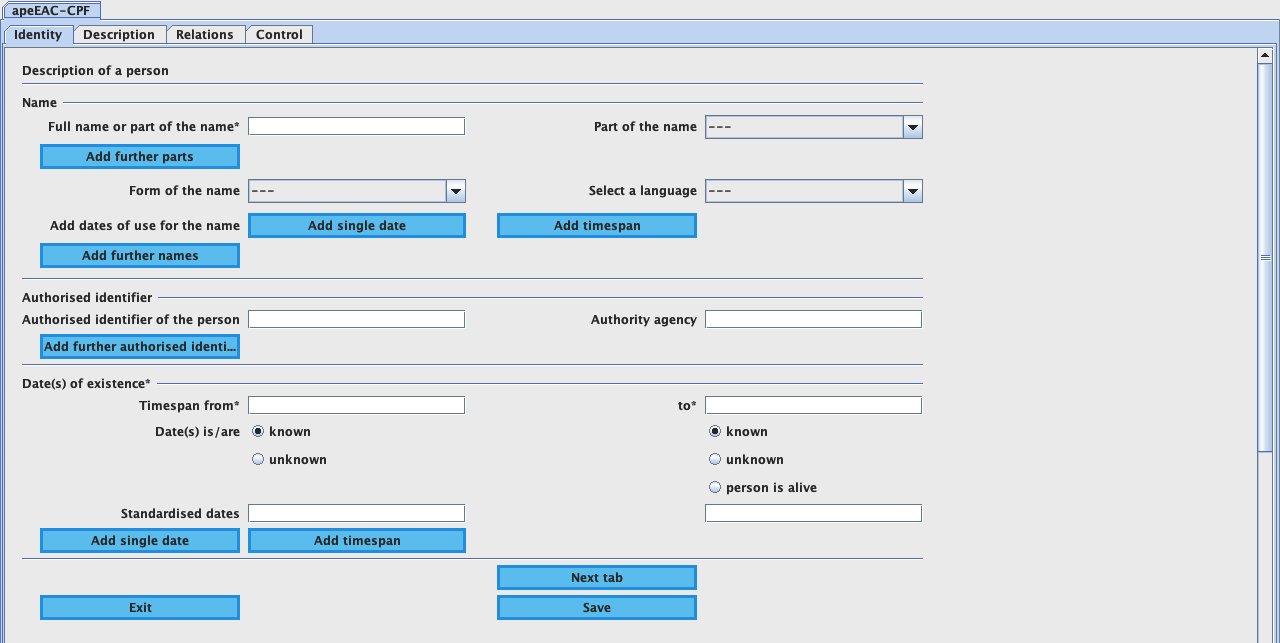
The Identity tab

The form itself has four tabs, the first of which, the Identity tab, holds all basic information about the entity: its name(s), authorised identifier(s), and date(s) of existence.

  • Name: you can provide the name in full or you can split it into several parts, e.g. giving the first name and the last name of a person separately. A drop-down menu lets you choose the type of part of the name. You can also specify if the name is authorised, alternative, preferred, or abbreviated, and you can add a date range during which the name was use, e.g. when giving the name of a person before and after getting married and taking the name of their spouse. At least one instance of this set of name fields must be provided.
  • Authorised identifier: if you have e.g. taken the name of the entity from an authorised vocabulary such as VIAF or Wikidata or the Getty Union List of Artist Names etc., give the identifier used in this vocabulary as well as the maintenance agency for the vocabulary here.
  • Date(s) of existence: you will need to provide a date of birth/foundation and a date of death/closure, but you can also specify either date as unknown respectively the end date as "alive" (for a person) and "ongoing" (for a family or a corporate body). Standardised dates will be created automatically based on your entries, though you will still be able to edit them.
The Description tab

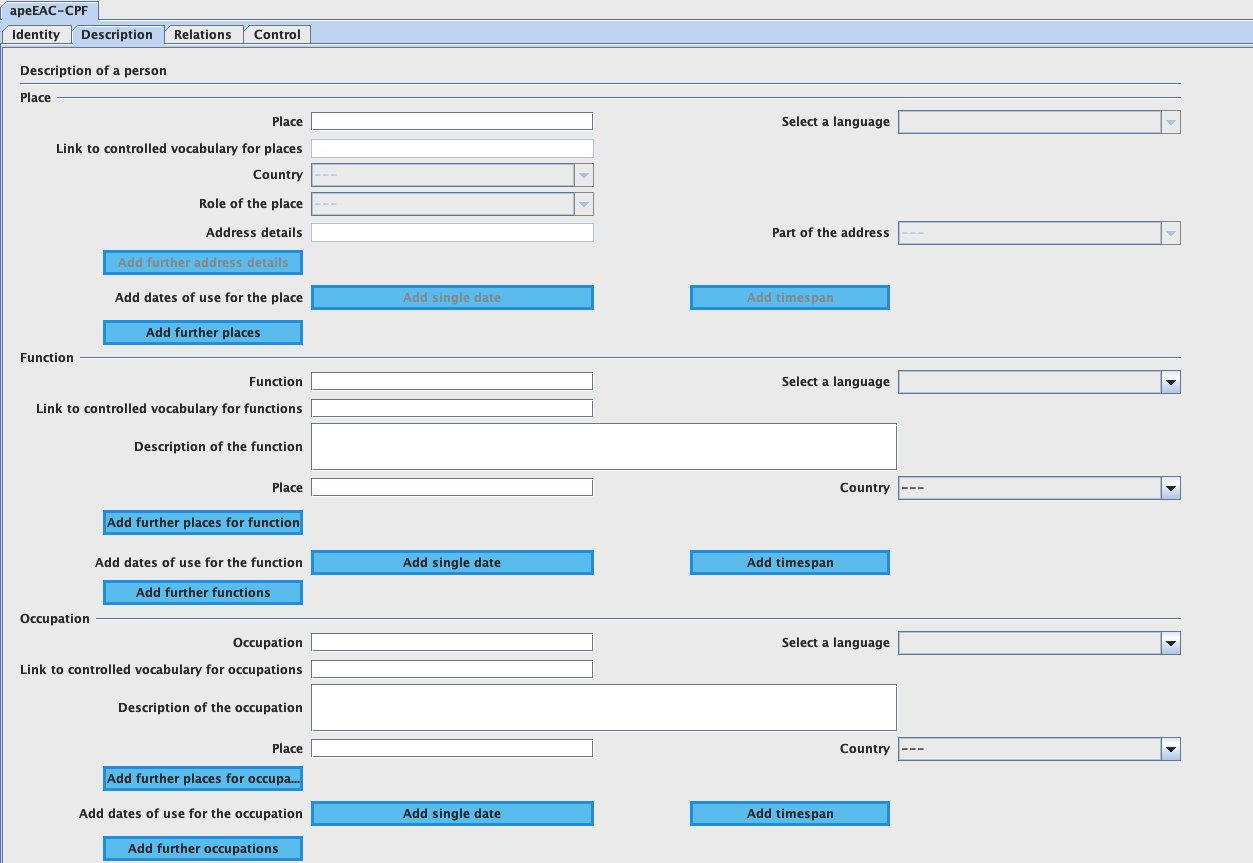
Here you can provide further information on the given entity, if available. The entry fields available will to some extent depend on the type of entity you are describing. The following gives examples for when describing a person, but the general functionalities of comparable fields for families and organisations apply in the same way.

  • Place(s): you can list all places that are of importance in the existence of the person being described. You can name each place along with the country where the place is located and you can provide address details, a role (e.g. place of birth, place of death, work place), a link to a vocabulary from which you might have taken the name of the place, and a date range, e.g. when the person you are describing only lived at a specific place for a certain time.
  • Function(s): you can list all functions that the person described has held or holds along with a link to a vocabulary from which you might have taken the term for the function. You can also describe the function if wanted and you can link the function to one or more places and to one or more timespans if applicable.
  • Occupation(s): you can list all occupations that the person described has had or has along with a link to a vocabulary from which you might have taken the term for the occupation. You can also describe the occupation if wanted and you can link the occupation to one or more places and to one or more timespans if applicable.
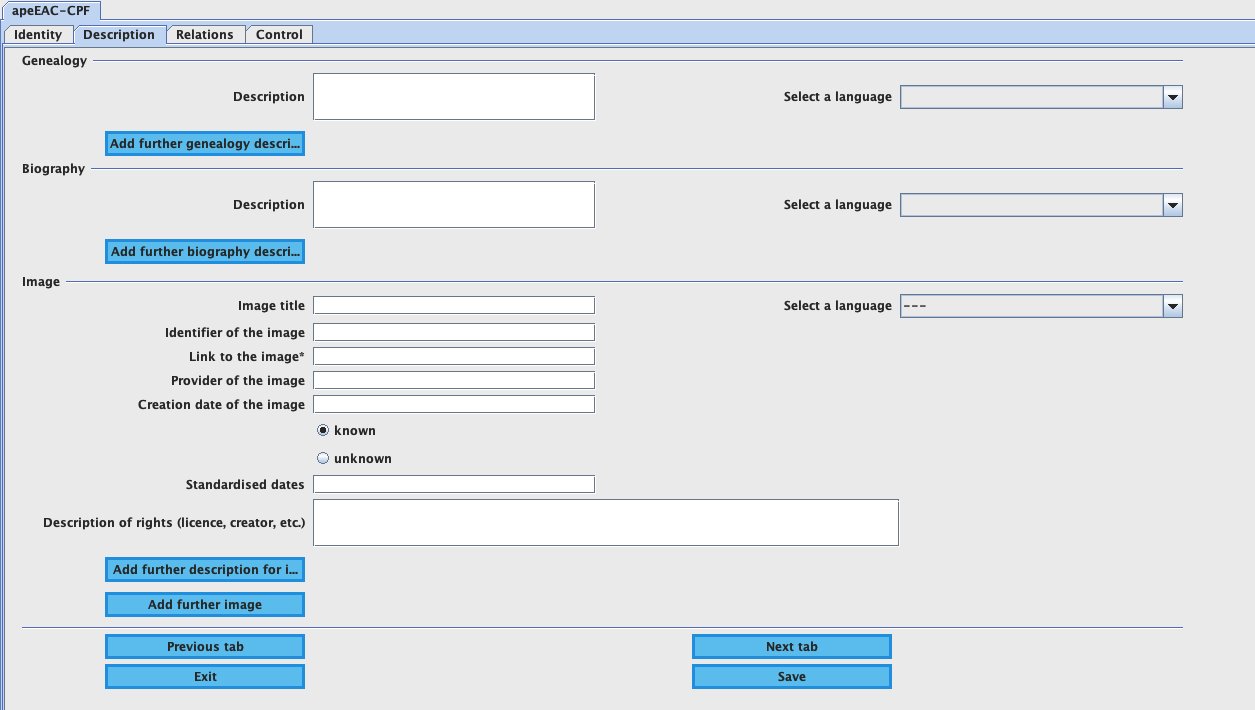
  • Genealogy: here you can provide information about family relations of the person you are describing. You can add several paragraphs to create a longer genealogy or only add a brief summary and use a repeated paragraph to provide the same information in a different language.
  • Biography: furthermore, you can add descriptive biographical information of the person in question. You can add several paragraphs to create a longer biography or only add a brief summary and use a repeated paragraph to provide the same information in a different language.
  • Image(s): you can include one or more image(s) of the person being described, which will - technically - be treated like a resource relation (see more on relations below). You will need to provide at least a link to the image file and can add an image title and identifier, a creation date of the image, the name of the provider of the image (e.g. a family member or the photographer taking the picture) as well as any rights and licensing information relevant to the image.
The Relations tab

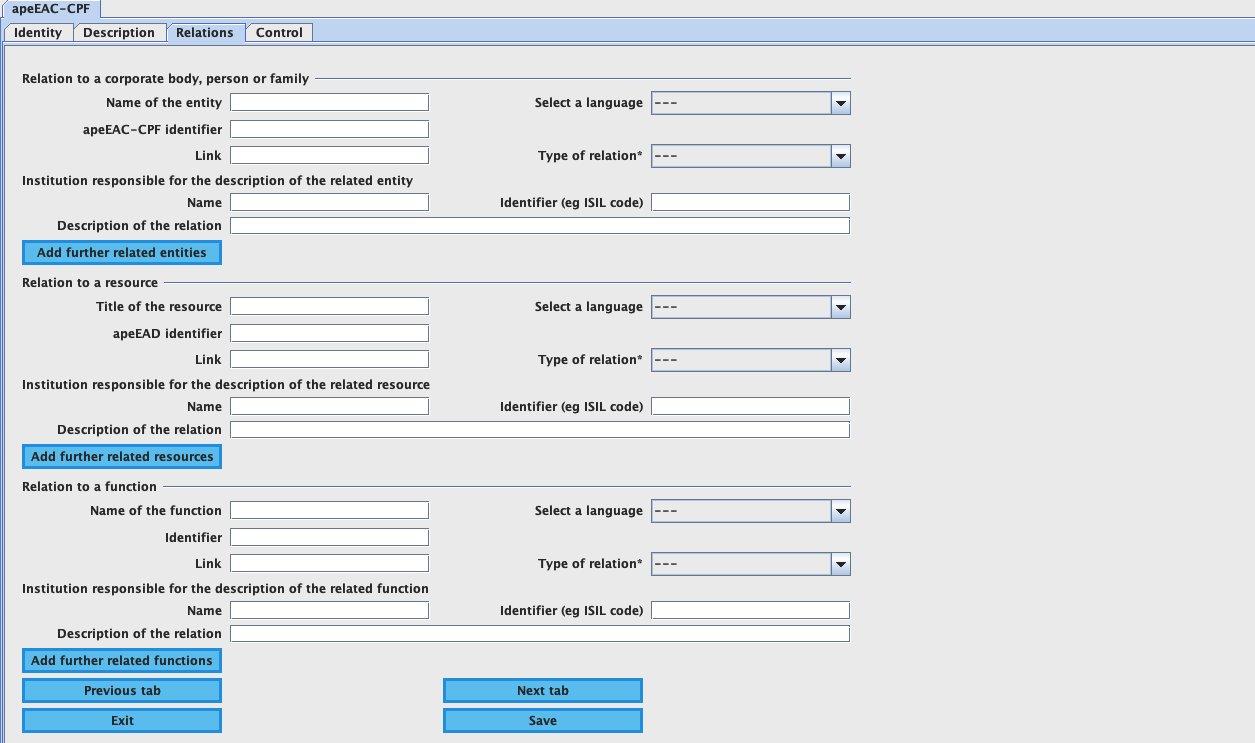
This tab holds all information on relations between the described entity and other persons, families, or corporate bodies, resources, and functions. While each type of relations has its own section within this tab, they all use the same set of fields:

  • The Name or title of the related entity, resource, or function;
  • The Identifier of the related entity, resource, or function;
    if a related entity or resource also is - or will be - available in Archives Portal Europe, it is sufficient to provide the content of the elements <eadid> (for resources) respectively <recordId> (for other entities) in this field. The portal will use this to create an active link once both parts of the relation have been published.
  • A Link to the description of the related entity, resource, or function;
    this will be mainly be necessary, if such description is published outside of Archives Portal Europe;
  • The Type of relation (to be chosen via a drop-down menu);
  • Information about the institution that has created and maintains the description of the related entity, resource, or function.
The Control tab

This tab holds all administrative data needed for the apeEAC-CPF file. It includes fields for the Identifier of the entity used in Archives Portal Europe, the name and identifier person or institution responsible for the description, (a) field(s) for (a) local identifier(s) of the description, and drop-down boxes for the languages and scripts used in the description.

Converting archival metadata to EDM

Based on valid apeEAD files including links to digital objects, the tool can create files in the Europeana Data Model (EDM) for sharing data with Europeana, the cross-domain portal for digital cultural heritage. To start this apeEAD to EDM conversion, select an eligible file from the list in the tool and then click the "Convert to EDM" button in the "Summary" tab.

This will open a new window where you have to select different options to fine-tune the semi-automatic apeEAD to EDM conversion. All fields are mandatory, except for the one to Specify additional rights information. For all mandatory aspects, it is possible to have the tool check for existing information in the apeEAD file, so that any value provided via the tool will only be used in cases, where there is no according information in the file.

At the top, there are four general settings related to Identifiers, Titles, and Links used in your data. Furthermore, you will have to provide the name of the Data provider (usually, your institution), information about the Type of digital objects includes in the file (e.g. TEXT or IMAGE), the Language of the material (several can be selected) and the Language of the description (only one can be selected), and the Licence applicable to the digital objects.

Additionally the conversion will automatically copy contextual information from higher levels within the apeEAD hierarchy, e.g. the name of the records creator, but also references to related material or publications, to the lower levels including the links to the digital objects in case this is not available on these lower levels directly.

Please note: as Europeana's focus is on digital cultural heritage objects, the EDM conversion will only include those parts of the EAD finding aids that link to digital archival objects. This means that any intermediate hierarchical levels, i.e. any descriptive level between the fonds or collection and the files or items linked to the digital archival objects, will be left out of the EDM conversion. This also means that any files and items that might not link to digital archival objects will be left out. Furthermore, the conversion will create a separate EDM XML file for each component that is linked to a digital archival object rather than keeping all in one XML file like in EAD. There will also be one EDM XML file representing the fonds or collection as a whole in order to at least have some reference to the archival context to which the single items belong.

This different approach means two things:

  • While EDM allows for hierarchical and sequential relations with the elements <dcterms:hasPart>, <dcterms:isPartOf> and <edm:isNextInSequence>, the hierarchical relations will be flattened, i.e. there is only a general "hasPart" and "isPartOf" relation between the fonds and collection as a whole and the single items, and the sequential relations might not necessarily be equivalent to what they are in the hierarchical archival structure as now a "nextInSequence" relation might point to an item that is not directly preceding the item we are looking at and might even be part of a different series when seen in the EAD finding aid.
  • The hierarchical inheritance of information that is inherent to archival description gets seemingly lost when transforming to EDM. Archives Portal Europe's EDM conversion tries to work around this by copying information that is usually inherited, e.g. the name of the records creator or the name of the holding repository, from higher levels to those lower levels that include the links to the digital objects - as long as those elements do not already exist on those lower levels anyway.

See all details of the EDM conversion in this apeEAD to EDM overview.

Listing the index terms of your files

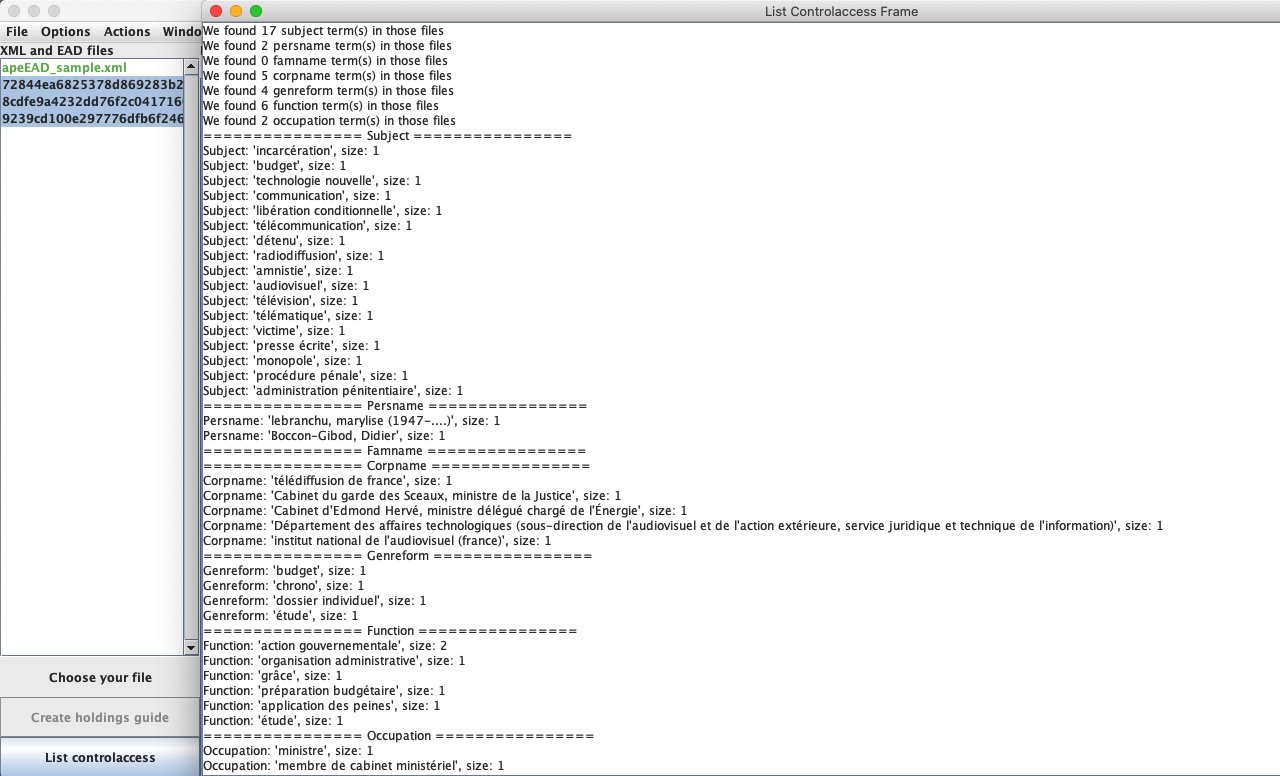
This option (only available in the DPT v2.0.5 or higher) lets the tool read the files you have selected and list all subelements of <controlaccess/> available in them in terms of their total amounts and in terms of the contents used. You can start the process by selecting one or more files from the list in the tool and then clicking the List controlaccess button at the bottom of the list.

You will be presented with a report giving you the total amounts of subject terms, personal names, family names, organisational names, function terms, occupation terms, and genre terms found and then listing each distinct term for your information. This can be useful for two reasons:

  • To prepare for mapping your file(s) to the topics used within Archives Portal Europe (see the Institution Manager manual for more information).
  • To rapidly check the indexation terms of your file(s) for the topics functionality or for other purposes, like creating thesauri.

Validation errors, meaning and possible fixes

The following is a list of common validation errors that you might get when working with your files in the Data Preparation Tool. Please note that this list does not aim at being comprehensive, but concentrates on those errors that come up relatively often. Ways of fixing validation errors will depend on the type of file and the schema used for validation. E.g. if you are validating your original EAD 2002 file against the apeEAD schema, there is a certain likelihood of validation error showing, because apeEAD is only a subset of EAD 2002 and also applies a few additional restrictions.

Text found in the validation tab: You are using the forbidden value 'XX' in the attribute 'YY' of the element 'ZZ'.

  • Meaning: You are using a wrong attribute value. For example, you might be using a "c" element with attribute "level" with a value "wrongValue", which is not allowed.
  • Possible way to fix: The value of the attribute must be correct, so try to correct this in the original file if possible; modify the conversion stylesheet used for your purposes or create your own stylesheet. In case you have validated your original EAD 2002 file against the apeEAD schema when getting this error, you might be using an attribute value that apeEAD does not support; try converting your file and see if the conversion already takes care of this difference. Should you still get the same error, please contact us, selecting "Technical issues" from the drop-down menu.

Text found in the validation tab: The element 'XX' is missing at least one of the following sub-elements: 'YY'.

  • Meaning: Some elements have mandatory sub-elements that have to be present (though they might not always be required to have content, i.e. could also be left empty). This message means you are not using all the mandatory elements needed. So here, element 'XX' does not contain the mandatory element 'YY'.
  • Possible way to fix: Correct this in the original file (this element must already be missing in there) or - in case a stylesheet does not do its job correctly and deletes elements - fix the stylesheet.

Text found in the validation tab: The element 'XX' has been found but should not appear here, only one (or more) of the following element(s) are accepted here: 'YY'.

  • Meaning: An element appears where it should not. For example, you can have an XML containing: <c><did><scopecontent>, which is not allowed because <scopecontent> should appear outside of <did>.
  • Possible way to fix: Fix this in the original file so the order of the elements is correct or - in case a stylesheet passes elements earlier in the chain and should wait for its turn - fix the stylesheet. In case you have validated your original EAD 2002 file against the apeEAD schema when getting this error, you might use an element that apeEAD does not include; try converting your file and see if the conversion already takes care of this difference by moving the content of your element into another, equivalent one. Should you still get the same error, please contact us, selecting "Technical issues" from the drop-down menu.

Text found in the validation tab: The element 'XX' has been found but should not appear here, no child element is allowed here.

  • Meaning: An element which cannot contain sub-elements does contain one. For example, element <persname> contains a sub-element <unitdate>.
  • Possible way to fix: Fix this in the original file, or add a rule in the stylesheet to ignore the sub element and only copy the data of that element, or add a rule in the stylesheet to copy the element or its data to another wrapper element, where it would also be fitting and allowed. In case you have validated your original EAD 2002 file against the apeEAD schema when getting this error, you might use an element that apeEAD does not include; try converting your file and see if the conversion already takes care of this difference by moving the content of your element - or the element as a whole - into another, equivalent one. Should you still get the same error, please contact us, selecting "Technical issues" from the drop-down menu.

Text found in the validation tab: The declaration of 'XX' was not found, your file might not contain the corresponding schema declaration (xmlns).

  • Meaning: The element 'XX' was not found at the root of the document, which means the file you are trying to validate is not using the schema against which you are validating.
  • Possible way to fix: You can try to first convert your file, then validate it; maybe your XML file does not contain the mandatory schema namespace; maybe you are trying to validate an EAD file with another schema (EAG 2012 for example).

Text found in the validation tab: You are using the value 'XX' in an attribute that can only contain one of those values: 'YY'.

  • Meaning: An attribute contains a wrong value. Only a value from a list can appear here and you are using a forbidden value not existing in that list.
  • Possible way to fix: Fix this in the original file or add a rule in the stylesheet to transform that special value into a not forbidden value. In case you have validated your original EAD 2002 file against the apeEAD schema when getting this error, you might be using an attribute value that apeEAD does not support; try converting your file and see if the conversion already takes care of this difference. Should you still get the same error, please contact us, selecting "Technical issues" from the drop-down menu.

Text found in the validation tab: Missing content for title information (unittitle): {0}

  • Meaning: The element <unittitle> is empty. Note that this can be "normal", depending on your description and the way it is structured and displayed in your system, but the result will be the display of "No title specified" in the hierarchy within Archives Portal Europe. This is not a validation error that would lead to your file being rejected, but it is recommended to provide title information whenever possible.
  • Possible way to fix: Fix this in the original file

Text found in the validation tab: Missing normalised date information (unitdate@normal): {0}

  • Meaning: The element <unitdate> is not normalised and contains only text; the consequence is that the file is not searchable by date. Note that this can be "normal", depending on your description and the way it is structured. This is not a validation error that would lead to your file being rejected, but it excludes your file from certain search functionalities in Archives Portal Europe.
  • Possible way to fix: Fix this in the original file or add rules in the sub-item "List of date conversion rules" of the "Options" menu.

Text found in the validation tab: Missing information on digital object type (dao@xlink:role): {0}

  • Meaning: The element <dao> does not include the attribute @xlink:role, which is used in Archives Portal Europe to provide the type of digital object (e.g. TEXT or IMAGE). Note that this can be "normal", depending on your description and the way it is structured. This is not a validation error that would lead to your file being rejected, but it excludes your file from certain search and display functionalities in Archives Portal Europe as the default value UNSPECIFIED will be applied instead.
  • Possible way to fix: Fix this in the original file or set a digital object type rules in the sub-item "Digital object type / Rights" of the "Options" menu.

Text found in the validation tab: Wrong information on digital object link (dao@xlink:href):{0}

  • Meaning: The link to the original document will not work because it is not an absolute URL, but e.g. only a relative one such as "/image1.jpg" that only works within your own environment.
  • Possible way to fix: Fix this in the original file or add a rule when exporting your file to include the full URL or URI.

Normalisation rules for the conversion of dates

Next to the sub-item "List of date conversion rules" in the "Options" menu, where you can set your own rules for the normalisation of descriptive dates, the default conversion to apeEAD included in the DPT already uses some standard normalisation rules for mostly numeric dates. In this context, the conversion script reads the content of the element <unitid> for the date of creation and transforms this into a value for the attribute @normal according to the ISO standard 8601. The content of the <unitid> element itself remains unchanged, e.g. <unitid>01.01.1985</unitid> is transformed into <unitid normal="1985-01-01">01.01.1985</unitid>.

Value read in the original file (<unitid>) Value transformed in the apeEAD file (<unitid@normal>)
01.01.1985 1985-01-01
1.1.1985 1985-01-01
1985.01.01 1985-01-01
01.01.1985/02.01.1985 1985-01-01/1985-01-02
1.1.1985 - 2.1.1985 1985-01-01/1985-01-02
1985.01.01/1985.01.02 1985-01-01/1985-01-02
01011985 1985-01-01
01011985/02011985 1985-01-01/1985-01-02
19850101 1985-01-01
19850101/19850102 1985-01-01/1985-01-02
1985—1986 1985/1986
1985 – 1986 1985/1986
1985 - 1987, 1990 1985/1990
1985, 1987 - 1990 1985/1990
03.07.1985 bis (to, à, etc.) 06.07.1985 1985-07-03/1985-07-06
3.7.1985 bis (to, à, etc.) 6.7.1985 1985-07-03/1985-07-06
1985 bis (to, à, etc.) 1988 1985/1988
avant 1985 0000/1985
après 1985 1985/2999
around 1985 1985
15th century/siècle/Jhd./... 1400/1500
century timespan (15th to 17th century) 1400/1700
(1985) 1987 – 1990 1985/1990
1985 - 1987 (1990) 1985/1990

Remarks on <eadid>

The <eadid> element is mandatory within EAD 2002 in general, but can theoretically be left empty. It does, however, require content in the context of apeEAD as this is necessary for managing files within the Archives Portal Europe. Therefore, the tool performs a check on whether <eadid> contains a value during the conversion or the validation of each file.

If an existing <eadid> element contains no value, the tool will ask you to provide one manually via a pop-up window. The tool proposes by default the identifier found in the element "/ead/archdesc/did/unitid", if it exists, which usually represents the identifier of the collection or series described in the EAD file. But you are of course free to use any other <eadid> that makes sense for your description.

Remarks on external links

The elements <dao/>, <extref/> and <extptr/> should contain the attribute @xlink:href. This attribute must be well formatted and contain the full URL, i.e. usually beginning with http:// or https:// in order to provide a valid link to the original resource on your or another website.

You can place external links for different purposes:

  • To link back to your own search enging or presentation of the archival descriptions: this can be done at any level of description;
  • To link back to your digitised documents and to display a thumbnail in the portal (if available);
  • To link to any other external resource online, e.g. as part of the scope and content note or the biography.

In the case of linking back to a digitised image (could also be SOUND, TEXT, VIDEO, 3D, UNSPECIFIED) as well as including a thumbnail, the encoding for the <dao> element would be:

<dao xlink:href="[valid URL to the thumbnail]" xlink:title="thumbnail"/>
<dao xlink:href="[valid URL to the digitised image]" xlink:role="IMAGE" 
xlink:title="[Any title you want to give to your image (optional, but recommended for accessibility reasons)]"/>

For content providers

Standards Supporting software

Archives Portal Europe help guide

Please select amongst the relevant tips we can help with. If you still have questions, please do not hesitate to contact us, and we will be in touch as soon as possible.

Starting your search here will include all content available in Archives Portal Europe. Simply enter your keyword(s) and hit the search button. Wrap fixed expressions in quotation marks, e.g. “French Revolution”. Check the box to “Search each term separately” in case you are looking for documents containing at least one word, but not necessarily all keywords; this will also allow you to search for the same term in multiple languages at the same time (e.g. “French Revolution” “Révolution Française”). You can also use wildcards - find more about Research Tools here. If you would like to use more specific settings, try our Advanced search

The additional advanced search options give you the possibility to focus your search in:

  • archival documents (Search in archives),
  • names of person and organisations that created, worked with and maintained these documents (Search in names),
  • Institutions currently holding the documents (Search in institutions).

When searching with multiple terms at the same time, wrap fixed expressions in quotation marks (e.g. "French Revolution"), or check the box "Search each term separately" in case you are looking for either one term of the other. This will also allow you to search for the same term in multiple languages (e.g. "French Revolution" "Révolution française"). You can also choose one of the suggestions matching your search term once you start typing.

This will only show results that include documents that have been digitised and are available online

Use this option to search only one or more keywords, rather than all of them

Select where your search terms should appear specifically inside the archival description:

  • Title: search terms will appear in the title, or name, of the description
  • Content Summary: search terms will appear in the main description of the document or of the collection
  • Reference code: it is the identifier of the archival material as provided by the institution. Use this option if you know the exact reference code of the material you are looking for

You can filter results by selecting where your search terms appears specifically inside the archival description:

  • The name can be the full name of a person, family or organisation as well as only parts of it, e.g. only the last name.
  • The identifier is used internally by the institution or refers to (inter)national vocabularies such as the Virtual International Authority File (VIAF).
  • The place can be the place of birth (or foundation), the place of death (or closing), the place of work or any other place of importance.
  • The occupation is the profession or job of a person.
  • The mandate is a law, directive or charter that establishes and defines an organisation's powers, functions, responsibilities or sphere of activities.
  • The function is an activity, role, or purpose performed or manifested by a person, family or organisation.

You can filter results by selecting where your search terms appears specifically inside the description of the archive:

  • Name: search term appears in the name of the institution. It can be the full name of an archival institution or only parts of it.
  • Place: search term appears in the address or area of the institution. It can be the city or town, where the archival institution is located or any other place of importance (e.g. previous locations)

  • A finding aid is a structured description of archival materials per collection or fonds, up to item level.
  • A holdings guide is an overview of the collections and fonds of one archival institution.
  • A source guide is a topic-oriented overview of collections and fonds of one or several institutions.
    You can filter by one or more entity types:
  • A person (e.g. John Locke, or Jean Jaques Rousseau);
  • A family (e.g. Bonaparte, or Helgason);
  • A corporate body, i.e. the name of an institution, organisation, or company (e.g. Ministerie van Justitie, or Electro Mecánica Antonio Armentano)

Please note that this filter will only include institutions, for which a type has been provided as part of their descriptions:

  • A business archive holds the records of (often) commercial organisations.
  • A church or religious archive holds the records of church parishes or religious organisations, e.g. birth or death registers.
  • A county or local authority archive holds the records of the county's administrative bodies.
  • A media archive holds audiovisual or sound records, e.g. a film archive or the archive of a broadcasting company.
  • A municipal archive holds the records of a town or city administration.
  • A national archive holds the records of a country's administrative bodies, i.e. from ministries and other public bodies, sometimes also private papers of former ministers, chancellors, or presidents.
  • A private person or family archive holds the records forming the legacy of a prominent person or family.
  • A regional archive holds the records of a region's administrative bodies.
  • A specialised governmental archive holds records of public bodies, often operating on a national level, that are not part of the national archives' holdings.
  • A specialised non-governmental archive or archive of another cultural heritage institution hold collections from various cultural heritage institutions, eg. museum archives, libraries archives, etc
  • A university archive or archive of another research organisation holds the records pertaining to the administration of the according educational or research body.
  • Political parties, popular/labour movements and other non-governmental organisations, associations, agencies and foundations hold the archival collections of these institutions, outside of governmental records and outside of business archives (e.g., NGOs)

Enter a start and/or end date in the format DD-MM-YYYY, i.e. 01-01-1900 for 1 January 1900. This will allow you to focus your search on a specific period of time. You can use the calendar function or type directly in the text field. The checkbox "Exact date search" concentrates the search on one specific date.

Check "View in context" to view the results in the hierarchical structure of archives.

  • Choose "List view" to view the results in a simple list, ordered according to relevance or date
  • Choose "Context view" to view the results in the hierarchical structure of the holding archives.

For more details see Research Tools

Please sign in to save your searches.

A holdings guide is an overview of the collections and fonds of one archival institution.

A finding aid is a structured description of archival materials per collection or fonds up to item level.

You can filter results by selecting one or more countries of interest. You can also combine this filter with other filters. Your filter selection will appear above. Click "Clear filters" to see all results matching your initial search request again.

You can filter results by one or more holding archival institutions. You can also combine this filter with other filters. Your filter selection will appear above. Click "Clear filters" to see all results matching your initial search request again.

You can select to view results from a specific Finding Aid, i.e., a structured description of archival materials per collection or fonds up to item level. You can also combine this filter with other filters. Your filter selection will appear above. Click "Clear filters" to see all results matching your initial search request again.

You can filter by type of descriptive document:

  • "Holdings Guide": an overview of the collections and fonds of one archival institution.
  • "Source guide": a topic-oriented overview of collections and fonds of one or several institutions. a description of the archival collections available. Similar to Holdings guides
  • "Finding aid" provides more detailed descriptions of the archival materials of specific collections or fonds

You can also combine this filter with other filters. Your filter selection will appear above. Click "Clear filters" to see all results matching your initial search request again.

You can filter results by selecting "Fonds description" for a general overview or "Other descriptions" for item level. You can also combine this filter with other filters. Your filter selection will appear above. Click "Clear filters" to see all results matching your initial search request again.

You can filter results by selecting only those containing digital objects, i.e. the link to the digitised version of the archival material you are looking for. You can also combine this filter with other filters. Your filter selection will appear above. Click "Clear filters" to see all results matching your initial search request again.

You can filter results by type of digital object you are interested in:

  • Text: most documental material, such as administrative records, letters, manuscripts etc.
  • Image: includes photographs, posters, maps.
  • Sound: sound recording with no images
  • Video: moving images with or without sound
  • Unspecified: indicates that the holding institution has not specified the type of digital object
  • 3D: 3-d digital objects

You can also combine this filter with other filters. Your filter selection will appear above. Click "Clear filters" to see all results matching your initial search request again.

You can filter results based on the date of creation of the archival material (which may differ from the time period you are interested in - e.g., philosophers from the Enlightenment period reflecting on classic thinkers)

  • Full dates includes normalised date information available for date-based searches. It is recommended to combine this selection with the filters "Start timespan" and "End timespan" for more details.
  • Only descriptive dates provides the date information in human-readable format.
  • No date either includes documents where the creation date is unknown, or where date information is not in a machine-readable format

Please note that not all documents contain a machine-readable date. More information here

You can filter results based on the date of creation of the archival material (which may differ from the time period you are interested in - e.g., philosophers from the Enlightenment period reflecting on classic thinkers). This filter will only include materials with "Full dates", i.e. those that include date information available for date-based searches. You can either search for a specific date of interest or focus step by step on the time span of a century, decade, year or month. When searching for a specific date, enter the date in the format DD-MM-YYYY, i.e. 01/01/1900 for 1 January 1900, via the calendar function or by typing directly in the text field.
This filter concentrates on the earliest dates mentioned in the materials.

You can filter results based on the date of creation of the archival material (which may differ from the time period you are interested in - e.g., philosophers from the Enlightenment period reflecting on classic thinkers). This filter will only include materials with "Full dates", i.e. those that include date information available for date-based searches. You can either search for a specific date of interest or focus step by step on the time span of a century, decade, year or month. When searching for a specific date, enter the date in the format DD-MM-YYYY, i.e. 01/01/1900 for 1 January 1900, via the calendar function or by typing directly in the text field.
This filter concentrates on the latest dates mentioned in the materials.

You can filter results based on the language in which the material is written. Please note that this filter will only include materials where specific language information has been provided by the institution and is therefore in a machine-readable format. You can also combine this filter with other filters. Your selection will then be displayed above the search results (see "Search filters"). Clicking "Clear filters" will remove your selection and you will see all results matching your initial search request again.


You can filter results by selecting one or more topics of interest. Please note that this filter will only include materials where the topic has been assigned and is therefore in a machine-readable format. Read how to assign a topic to documents on the Topics page. You can also combine this filter with other filters. Your selection will then be displayed above the search results (see "Search filters"). Clicking "Clear filters" will remove your selection and you will see all results matching your initial search request again.


You can filter results by selecting where your search terms appears specifically inside the archival description:

  • The name can be the full name of a person, family or organisation as well as only parts of it, e.g. only the last name.
  • The identifier is used internally by the institution or refers to (inter)national vocabularies such as the Virtual International Authority File (VIAF).
  • The place can be the place of birth (or foundation), the place of death (or closing), the place of work or any other place of importance.
  • The occupation is the profession or job of a person
  • The mandate is a law, directive or charter that establishes and defines an organisation's powers, functions, responsibilities or sphere of activities.
  • The function is an activity, role, or purpose performed or manifested by a person, family or organisation

You can also combine this filter with other filters. Your selection will then be displayed above the search results (see "Search filters"). Clicking "Clear filters" will remove your selection and you will see all results matching your initial search request again.

You can filter results by type of entities:

  • Person (e.g., John Locke or Jean Jaques Rousseau)
  • Family (e.g., the family Bonaparte)
  • Corporate body (an institution, organisation, or company, e.g. the "Ministerie van Justitie")
You can also combine this filter with other filters. Your selection will then be displayed above the search results (see "Search filters"). Clicking "Clear filters" will remove your selection and you will see all results matching your initial search request again.

You can filter results based on the language in which the material is written. Please note that this filter will only include materials where specific language information has been provided by the institution and is therefore in a machine-readable format. You can also combine this filter with other filters. Your selection will then be displayed above the search results (see "Search filters"). Clicking "Clear filters" will remove your selection and you will see all results matching your initial search request again.

You can filter results based on the type of holding institution. Please note that this filter will only include institutions, for which a type has been provided as part of their descriptions.

  • A business archive holds the records of (often) commercial organisations.
  • A church or religious archive holds the records of church parishes or religious organisations, e.g. birth or death registers.
  • A county or local authority archive holds the records of the county's administrative bodies.
  • A media archive holds audiovisual or sound records, e.g. a film archive or the archive of a broadcasting company.
  • A municipal archive holds the records of a town or city administration.
  • A national archive holds the records of a country's administrative bodies, i.e. from ministries and other public bodies, sometimes also private papers of former ministers, chancellors, or presidents.
  • A private person or family archive holds the records forming the legacy of a prominent person or family.
  • A regional archive holds the records of a region's administrative bodies.
  • A specialised governmental archive holds records of public bodies, often operating on a national level, that are not part of the national archives' holdings.
  • A specialised non-governmental archive or archive of another cultural heritage institution hold collections from various cultural heritage institutions, eg. museum archives, libraries archives, etc
  • A university archive or archive of another research organisation holds the records pertaining to the administration of the according educational or research body.
  • Political parties, popular/labour movements and other non-governmental organisations, associations, agencies and foundations hold the archival collections of these institutions, outside of governmental records and outside of business archives (e.g., NGOs)

Write your message in your own language and use this drop-down menu to have your message translated into English or in the language of the institution for a swifter response. By checking this box and selecting a language you will send your original message along with the translated version

What kind of suggestion would you like to make?

  • Assign to topic: assign this record to one of our Topics. Topics are created following the Unesco Thesaurus
  • Suggest translation: If you have translated this archival description or the documents themselves, please send it to us as a .doc or .pdf file
  • Connect to another resource: If this object relates to another resource in Archives Portal Europe, or anywhere else on the web (e.g., an article on Wikipedia), you can suggest it to be linked to this resource
  • Other: If you have any other relevant material, such as a transcription of the document, please upload it and let us know here

This is a test area to fill out all the copyright details for Attribution Creative Commons Licence

This object is not or no longer protected by copyright and has been labelled with the Public Domain Mark. It can be used by anyone without any restrictions.

This object is made available under the Creative Commons CC0 1.0 Public Domain Dedication. All possible existing rights in the content are waived, and the object can be used by anyone without any restrictions.

This object is made available under the terms of the Creative Commons - Attribution (BY) licence. You can copy, redistribute, remix, tweak, and build upon the licensed object, even commercially, as long as you attribute the rights holder as described in the licence.

This is a test area to fill out all the copyright details for Attribution Creative Commons Share Alike Licence

This is a test area to fill out all the copyright details for NoDerivs

This is a test area to fill out all the copyright details for NonCommercial

This object is in the public domain, but has been digitised as the outcome of a public-private partnership, where the terms of the contractual agreement limit commercial use for a certain period of time. You can copy, redistribute, remix, tweak, and build upon the object for non-commercial use only.

This object has been identified as an Orphan Work in the country of first publication and in line with the requirements of the national law implementing Directive 2012/28/EU of the European Parliament and of the Council of 25 October 2012 on certain permitted uses of orphan works.

You are free to use this object in any way that is permitted by the copyright and related rights legislation that applies to your use. Please note that you are responsible for your own use, including the need to obtain other permissions e.g. with regard to publicity, privacy or moral rights.

This object is in the public domain, but is subject to known legal restrictions other than copyright which prevent its free re-use. Please contact the providing institution for more information.

This object is currently in copyright. Please contact the providing institution for more information and in order to acquire additional permissions for re-use.

The copyright status of this object has not been evaluated yet. Please contact the providing institution for more information.

You are free to use this object in any way that is permitted by the copyright and related rights legislation that applies to your use. Please note that you are responsible for your own use, including the need to obtain other permissions e.g. with regard to publicity, privacy, or moral rights.

This object is currently in copyright and the rights holder(s) have allowed re-use for educational purposes only. You are free to use this object in any way that is permitted by the copyright and related rights legislation that applies to your use. Please note that you are responsible for your own use, including the need to obtain other permissions e.g. with regard to publicity, privacy or moral rights.

Please contact the providing institution for more information and in order to acquire additional permissions for any other uses.

This object is made available under the terms of the Creative Commons - Attribution, ShareAlike (BY-SA) licence. You can copy, redistribute, remix, tweak and build upon the licensed object, even for commercial purposes, as long as you attribute the rights holder as described in the licence, and you license your adaptations of the object under the same terms.

This object is made available under the terms of the Creative Commons - Attribution, ShareAlike (BY-SA) licence. You can copy, redistribute, remix, tweak and build upon the licensed object, even for commercial purposes, as long as you attribute the rights holder as described in the licence, and you license your adaptations of the object under the same terms.

This object is made available under the terms of the Creative Commons - Attribution, No Derivates (BY-ND) licence. You can copy and redistribute the object, even commercially, as long as no alteration is made to the object and you attribute the rights holder as described in the licence.

If you remix, transform or build upon the object, you may not distribute the modified material.

This object is made available under the terms of the Creative Commons - Attribution, Non-Commercial (BY-NC) licence. You can copy, redistribute, remix, tweak, and build upon the licensed object for non-commercial use only and as long as you attribute the rights holder as described in the licence.

This object is made available under the terms of the Creative Commons - Attribution, Non-Commercial, ShareAlike (BY-NC-SA) licence. You can copy, redistribute, remix, tweak, and build upon the licensed object for non-commercial use only, as long as you attribute the rights holder as described in the licence, and as long as you license your adaptations of the object under the same terms.

This object is made available under the terms of the Creative Commons - Attribution, Non-Commercial, No Derivates (BY-NC-ND) licence. You can copy and redistribute the object for non-commercial use only, as long as no alteration is made to the object and as long as you attribute the rights holder as described in the licence.

If you remix, transform or build upon the object, you may not distribute the modified material.

This object is in the public domain, but has been digitised as the outcome of a public-private partnership, where the terms of the contractual agreement limit commercial use for a certain period of time. You can copy, redistribute, remix, tweak, and build upon the object for non-commercial use only.

This object has been identified as an Orphan Work in the country of first publication and in line with the requirements of the national law implementing Directive 2012/28/EU of the European Parliament and of the Council of 25 October 2012 on certain permitted uses of orphan works.

You are free to use this object in any way that is permitted by the copyright and related rights legislation that applies to your use. Please note that you are responsible for your own use, including the need to obtain other permissions e.g. with regard to publicity, privacy or moral rights.

This object is in the public domain, but is subject to known legal restrictions other than copyright which prevent its free re-use. Please contact the providing institution for more information.

This object is currently in copyright. Please contact the providing institution for more information and in order to acquire additional permissions for re-use.

The copyright status of this object has not been evaluated yet. Please contact the providing institution for more information.

You are free to use this object in any way that is permitted by the copyright and related rights legislation that applies to your use. Please note that you are responsible for your own use, including the need to obtain other permissions e.g. with regard to publicity, privacy, or moral rights.

This object is currently in copyright and the rights holder(s) have allowed re-use for educational purposes only. You are free to use this object in any way that is permitted by the copyright and related rights legislation that applies to your use. Please note that you are responsible for your own use, including the need to obtain other permissions e.g. with regard to publicity, privacy or moral rights.

Please contact the providing institution for more information and in order to acquire additional permissions for any other uses.